The modern smartphone is arguably defined by its camera, or cameras to be exact – most handsets have several.
They’re capable of snapping high-quality images with minimal setup, and can even allow an inexperienced photographer to get a truly magical shot. But despite this point-and-shoot potential, there’s a lot more you can do with your smartphone ‘s camera. Just as a lot of work has gone into the hardware, developers have spent a long time making sure the native Android camera app is one of the most dynamic things on your device.
So maybe it’s time to make the most of that, move beyond “point and shoot,” and take your phone photography to the next level. Here are ten built-in tools that can help you do that.
Portrait mode is perfect for selfies
This is one you’re likely aware of, but here’s why it works so well. Portrait mode knows the focus is your face, so it blurs the background around it to make sure the focus stays on the subject of the image – you. It’s a photography technique called “shallow depth of field”, which professionals use a lot. Especially with things like headshots.
It’s not ideal for every situation, though. If you’re snapping yourself in front of the Eiffel Tower, it makes sense to have the background in focus too. But if you need a profile image or headshot without any other distractions, portrait mode is the best choice.

With portrait mode on, selfies have a completely different look and feel
Pro mode gives you more control
Modern camera apps are impressively advanced, and will do a great job on their own most of the time. But you may want to do something very specific that the automatic settings don’t quite understand. Or you may just believe you’re better at photography than an algorithm.
This is where “Pro Mode” comes in. It disables all of the automatic settings and gives you total control over the camera. That means you’re free to tweak things like ISO, Shutter Speed, White Balance, and Manual Focus to your heart’s content.
Pro mode is typically one of the main options above the shutter button
Anyron Copeman / Foundry
The downside to “Pro” mode is that you need to know what you’re doing to take advantage of it. While those manual settings are more forgiving than those on a traditional camera, and you’ll be able to see the effects of any adjustments immediately, you need to have some photography knowledge. Otherwise, you’ll likely miss a setting or tweak something that produces a worse result than the standard “automatic” camera.
Burst mode helps you pick that perfect moment
If your target isn’t moving, it’s pretty easy to photograph. You can get the perfect angle, make sure the focus is spot on, and tinker with the settings until you’re 100% happy with your shot. Unfortunately, a lot of things move. That’s why you need to know about “burst mode.” Burst mode does exactly what its name suggests. It takes several photographs in a short space of time, allowing you to choose the “best” one. It’s useful in a few situations, and action shots may be what springs to mind first.
If you’re trying to get a shot of someone kicking a football, burst mode has a better chance of capturing that exact point of contact than you do of timing things correctly. You should still get your angle right and set your focus to the expected point of contact, but a “burst” of photos will give you plenty of options and increase your chances of nailing a perfect shot.
It’s also handy for portraits. Think about how many “selfies” have been ruined due to a slightly off facial expression, dodgy squint, or stray bit of shadow. A “burst” has a good chance of snagging a shot right before or after the photo was ruined.
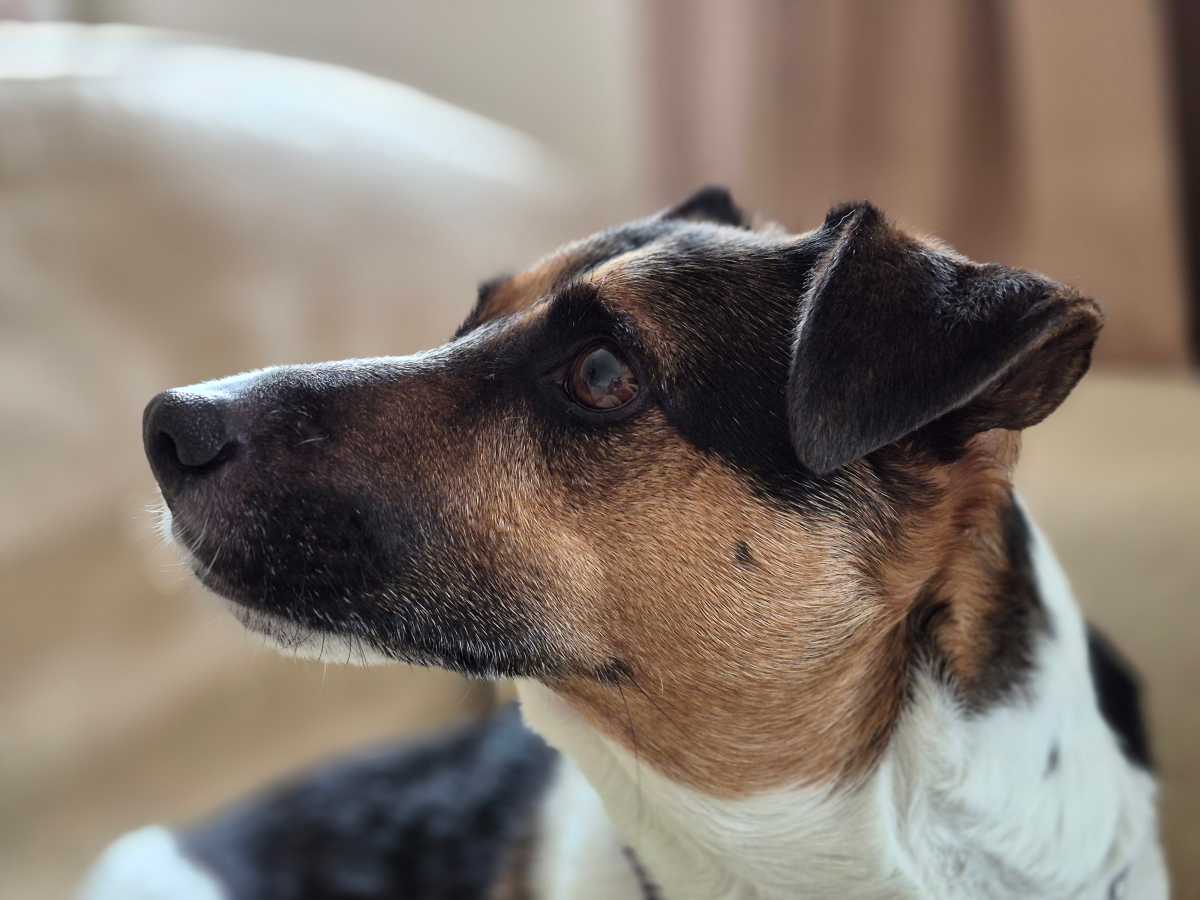
Burst mode is perfect for pet photography
Anyron Copeman / Foundry
Shooting in RAW makes post-processing a breeze
If you’ve ever owned a decent DSLR, you’ll know all about shooting in RAW. It’s a format that retains as much detail as possible, which in turn gives you more options when editing later.
It does take up more space than other formats, and it’s not that “upload-friendly,” so it should be used sparingly. But it is a great option if you really want your images to be as close to “professional” as possible. The ability to take RAW images has been around for a while. It was first introduced back with Android 5, but not all phones include the feature.
There are different ways to make your phone save photos in a RAW format, too; sometimes you have to dig through the settings, other times you have to be in “Pro” mode or a similar function.
Take RAW to the next level (Samsung Galaxy only)
Some models, like Samsung Galaxy phones, feature take things a step further with features like “Expert RAW.” This couples the RAW format with the phone’s photo processing software to the idea of “Pro” mode to the next level. You can still adjust things like focus, shutter speed, ISO, and white balance, but unlike with “Pro” mode, the phone will still tweak things under the hood. This can lead to sharper focus, better colors, and improved white balance.
Expert RAW is only available on selected Samsung flagships, meaning devices such as the Galaxy A17 5G miss out
Chris Martin / Foundry
Action Pan can give you that perfect cover shot (Google Pixel only)
If you have a Google Pixel, you likely have access to “Action Pan,” which automatically edits your images to give them a sense of motion. It’s not like a live photo, with the end result a still image. But it will look like something from the cover of a racing magazine.
Anyron Copeman / Foundry
This mode is ideal when you’re snapping things that move at speed. When you take a shot of a car or other object moving by in “Action Pan” the phone will identify the subject of the image (the car in this case). Once the subject is identified, the phone will blur the background around it to give it a sense of speed.
Night mode can improve a cheap camera
You don’t need to wait until the sun goes down to use “Night” mode, and it’s one of the easiest ways to improve a cheaper phone’s camera. Under ideal settings, and when shooting for something like social media (which isn’t particularly demanding in terms of resolution), the best budget phones will usually produce results that aren’t too far away from a higher-end phone’s output. But you’ll really see a difference when things get dark. A “photo” is essentially a recording of light hitting a sensor. If there’s less light hitting that sensor (like when it’s dark) then there’s less information to record. That’s why higher-end phones, with their more advanced sensors and lenses, do a far better job photographing things in less-than-perfect conditions.
You don’t have to wait until it gets dark to use night mode
However, “night” or “low light” modes use software to counteract this. They tend to require the phone to be held still for a little longer, but will often make adjustments so more light is allowed in through the lens, so even a poor sensor can gather more data for the photo. So consider shooting in night mode if you’re in a dimly lit restaurant, or a heavily shaded outdoors area.
HDR mode makes a big difference
The chances are you’ve seen the words “HDR Enabled” on your phone app’s screen. There’s also a chance you have no idea what that actually does. Well, don’t worry, we’ve got you. It stands for “High Dynamic Range”, and it’s a little trick the camera app uses when you have a high contrast scene. The camera will try to find a middle ground where everything is balanced correctly, but in some cases, parts will be too bright (overexposed) or too dark (underexposed).
HDR fixes this by taking several images. One in the middle, one overexposed, and one underexposed. These are then combined to create an image with far more accurate lighting than you would have otherwise.
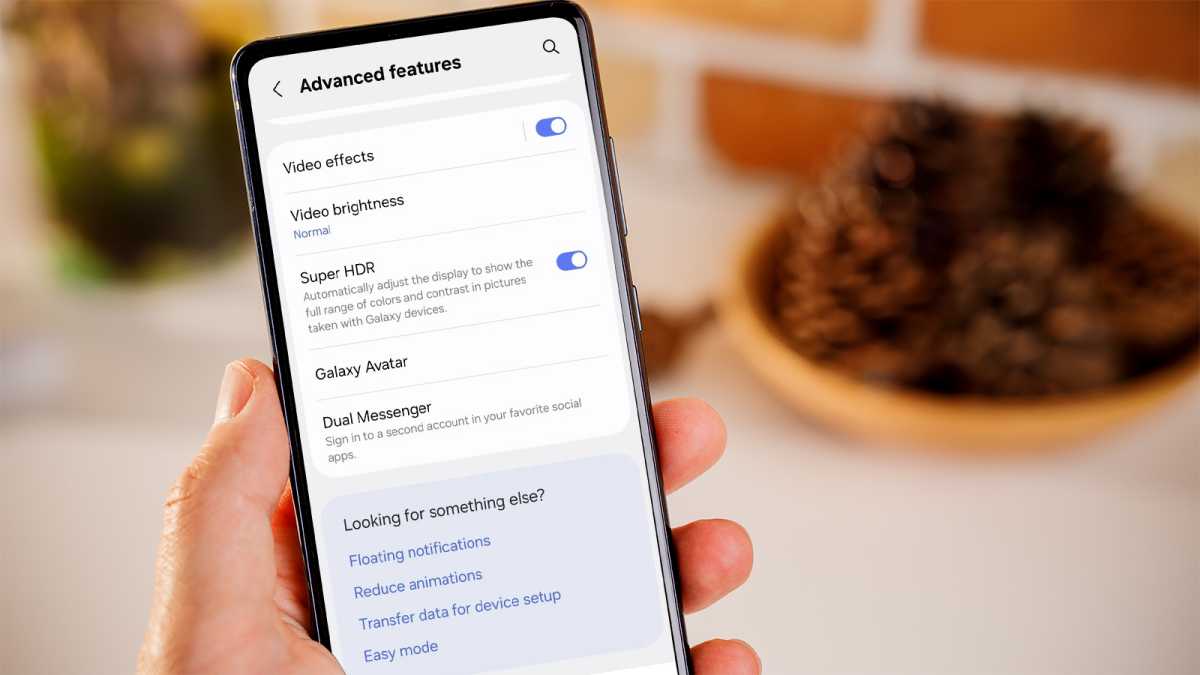
Samsung phones running One UI 7 or later even have a ‘Super HDR’ mode
Foundry
Lock in some key settings
Picture the scene. You’ve lined up your perfect shot, you’re waiting for the moment to be right, then your camera decides to focus on a tree off to the side instead of the raccoon emerging from its garbage can or whatever it is you were trying to capture. It doesn’t have to be this way. You may be familiar with picking a focus point by tapping on the screen. If you hold down on that point instead, then the focus will “lock” at that point, and there’s less danger of it straying. “Exposure”, which essentially controls brightness, can also be “locked in” with a slider.
Locking focus is easy to do and can be highly effective
Foundry
That’s handy when you’re in a high-contrast situation, and the camera can’t make up its mind. Yes, HDR solves this problem, but it can also mess the colors up or cause issues when you’re photographing moving objects. So, it’s good to have this tool in your bag.
Use AI for minor fixes
Smartphone cameras are constantly introducing new AI-focused features. Some of the more advanced ones can do things like enhance your zoom, or transform an otherwise boring photo into something else entirely. However, the actual quality of these AI tools varies greatly from tool to tool and provider to provider. There’s also an argument that some AI changes can be so drastic you may as well just save time and generate the whole image from scratch.
Super Res Zoom on the Pixel 10 series delivers questionable results
What AI is arguably best for is minor fixes. The sort of things you used to have to wheel out Photoshop for, but can now achieve with a simple prompt.
So if you need to sharpen focus, crop out a photobomber, adjust the lighting, remove an oddly shaped cloud, or make any other little adjustments, AI is the easiest way to do it. It’s also pretty much universally accessible through the Google Photos app.
As you can see, the native camera app on Android is already a very powerful tool, especially when used in combination with Google Photos. Like most things when it comes to photography, a little bit of tweaking can go a long way.
You may also be interested in 5 pointless Android features that you should ignore .
