If you don’t already have one in your car, a dash cam is the single best gadget you can buy. That’s because it will provide video evidence – an unbiased witness – that can help to prove what happened if you or someone else is involved in a collision, or some other bad driving.
There are lots of affordable options, and it’s a good idea to choose one which includes a rear camera as well as a front-facing one to cover the action that happens behind you.
Installing a dash cam isn’t complicated because they’re designed to be universal and fit any car. Even if you want to hard-wire it (which means connecting it permanently to your car’s electrical system rather than plugging it into a 12V accessory socket) it can still be a DIY job, and all this wiring is fully reversible if you ever need to remove it from the car: there’s no cutting or soldering.
Here, then is everything you need to know. I’m using a Viofo A229 Duo as an example here, which includes front + rear cameras, but the basic process is the same for all dash cams .
1. Find your 12V accessory socket
For most people, the simplest way to power a dash cam is using the accessory power socket – which you may know at the cigarette lighter socket. It’s usually in the centre console or near to the heater / air conditioning controls.
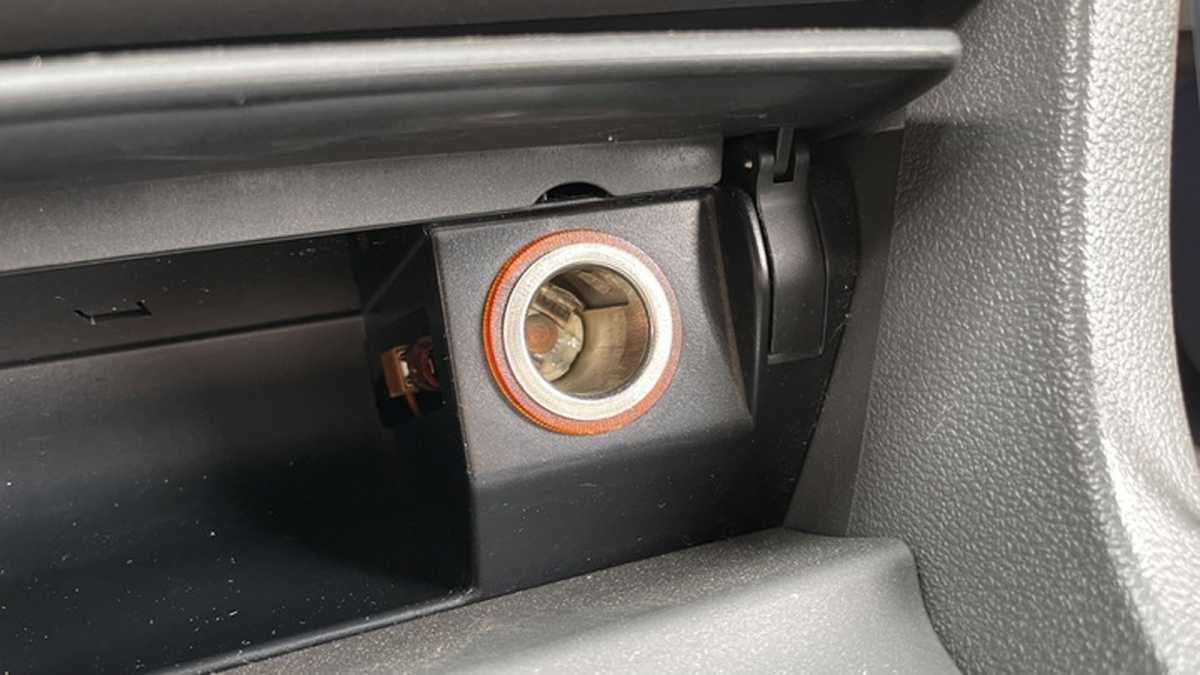
Jim Martin / Foundry
In most cars, there is power to this socket only when the ignition is on, which means it won’t record anything while the car is parked. A small minority of dash cams have built-in batteries to record while parked, but most require hard wiring to enable the use of parking mode.
2. Plan the location and wiring route
Before you do anything, plan where you will mount the dash cam. It shouldn’t obscure the driver’s view (which may be illegal in some states or countries) and is usually best placed behind the rear-view mirror on the passenger side of the vehicle.
From that location, plan where the power cable will go in order to reach the 12V socket. Typically, this will be along the top of the windscreen, around the edge of the door, down past the dashboard, across beneath the glovebox and to the power socket.
If you are going to hard-wire your dash cam, be sure to purchase the optional hard-wire kit, and find out where your car’s interior fuse box is located: this information can be found in the car’s user guide.
3. Mount the dash cam
Sometimes there’s a choice of suction or adhesive mounts. Always choose the adhesive mount, as this won’t fall off like suction cups sometimes do.
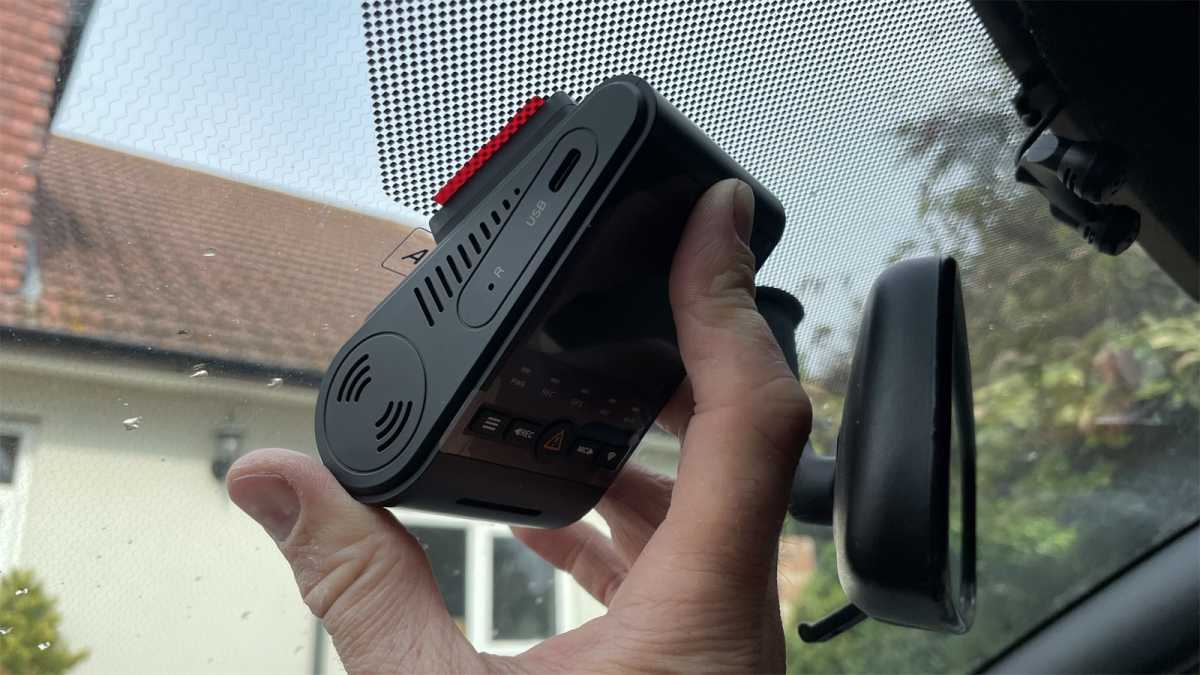
Jim Martin / Foundry
Before actually sticking the mount to the windscreen, check that the lens won’t be obscured by anything, including any shading or sunstrip on the windscreen.
Also make sure that there’s space to plug in the power wire (and rear camera wire, if installing a dual-camera model). Do this by first connecting the wires to the dash cam, then offering it up in your chosen location.
If all is ok, remove the backing paper and press the mount firmly into position.
4. Route the wiring
Following your plan from earlier, route the power cable starting from the dash cam and ending up at the power socket.
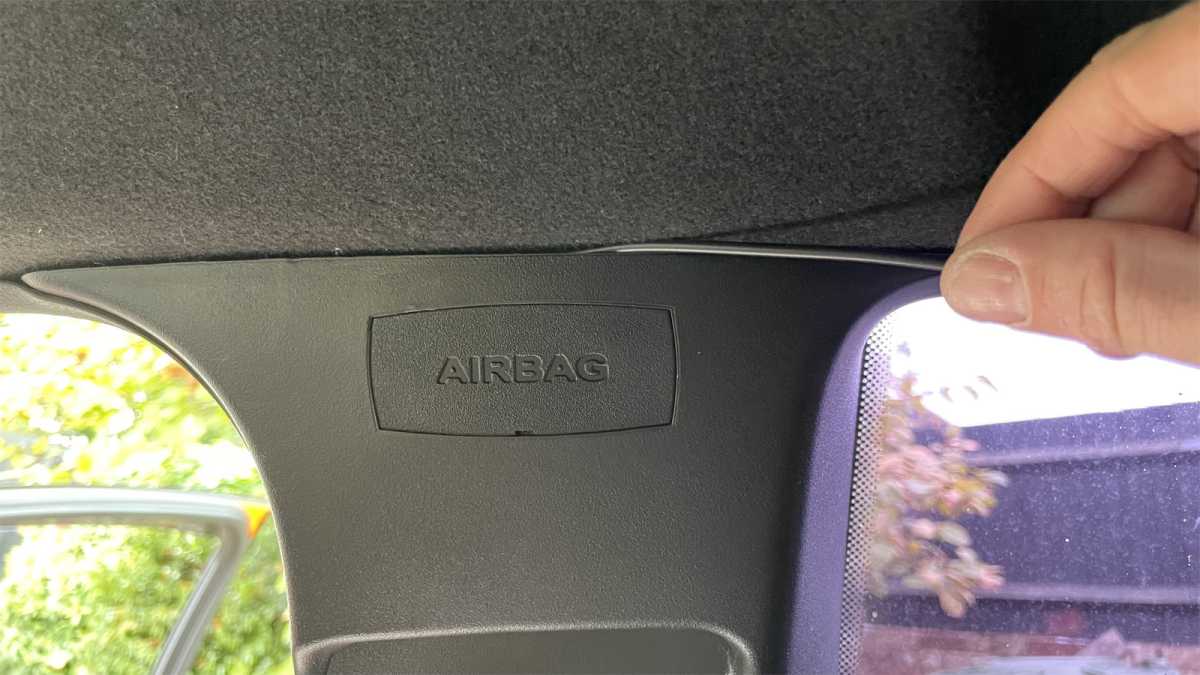
Some dash cams are supplied with adhesive cable clips to stick to the windscreen or trim, but it’s far neater to tuck the cable above the headliner, and behind the plastic trim down the side of the windscreen. You can either push it in or, if that’s not working, use a plastic trim tool to carefully prise open a gap big enough to push the cable into.
TIP: Instead of running the cable down the ‘A’ pillar to the bottom of the windscreen, route it to the rubber gasket that runs around the door, then down towards the dashboard: preferably low enough so it can then go under the glove box.
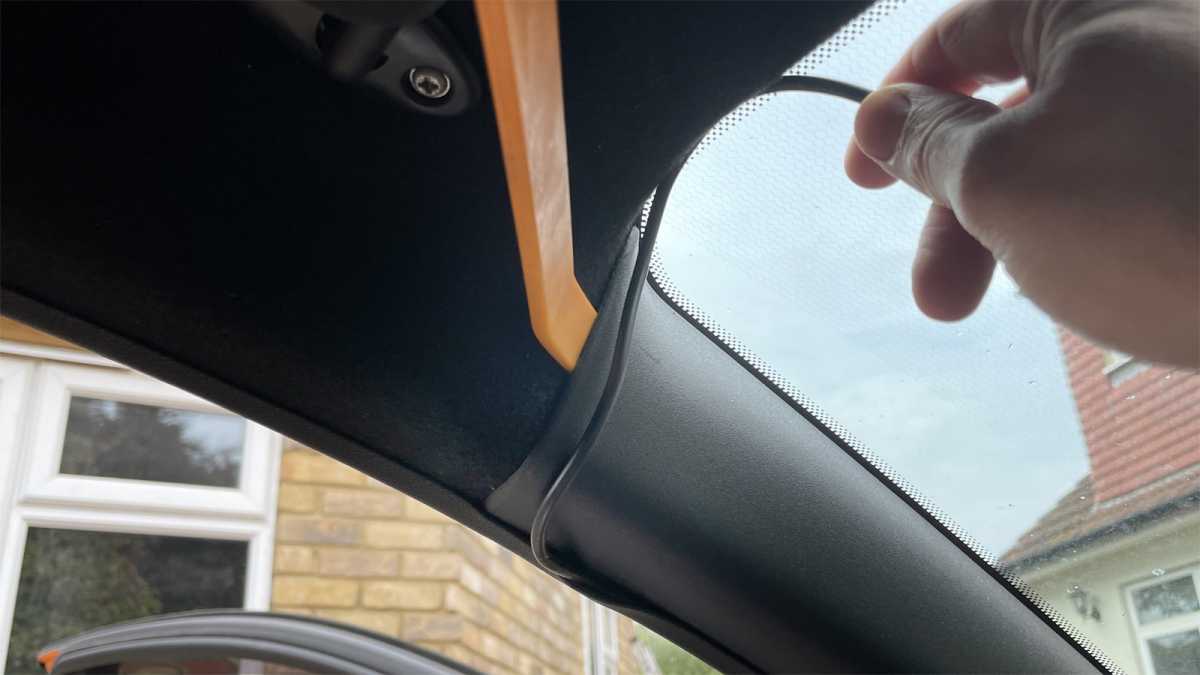
Jim Martin / Foundry
You may want to use a zip tie or two to hold the cable in place so it doesn’t dangle into the footwell.
It can be difficult to hide the wire completely from this point on to the power socket: it will depend entirely upon the design of your car’s dashboard and the location of the socket.
5. Install the rear camera
If you’ve opted for a dash cam with front and rear cameras, now’s the time to fit the rear one. The process is exactly the same as for the front camera.
Again, choose a location where it won’t obscure the driver’s view out of the rear window, but also remember that if you place the camera outside of the sweep of the rear windscreen wiper, the view could be very poor – especially in winter.
Jim Martin / Foundry
Route the cable in the most direct way possible. The rear camera usually connects to the front, meaning the obvious cable route is along the top of the windscreen, along the top of the doors, then across the rear window.
If your car is a hatchback, you may have to leave a loop of wire so there’s enough to reach the camera when the tailgate is raised, as shown here.

Jim Martin / Foundry
It can be worth temporarily connecting the rear camera to the front one, turning on the ignition and holding it in position while it records a few seconds of video (or using the live view in a companion app) so you can be sure the view is good before mounting it.
Ideally, you want to avoid one of the heated rear windscreen wires running across the centre of the image, and mount the camera so the lens peers between two of the wires.
6. Power up
Jim Martin / Foundry
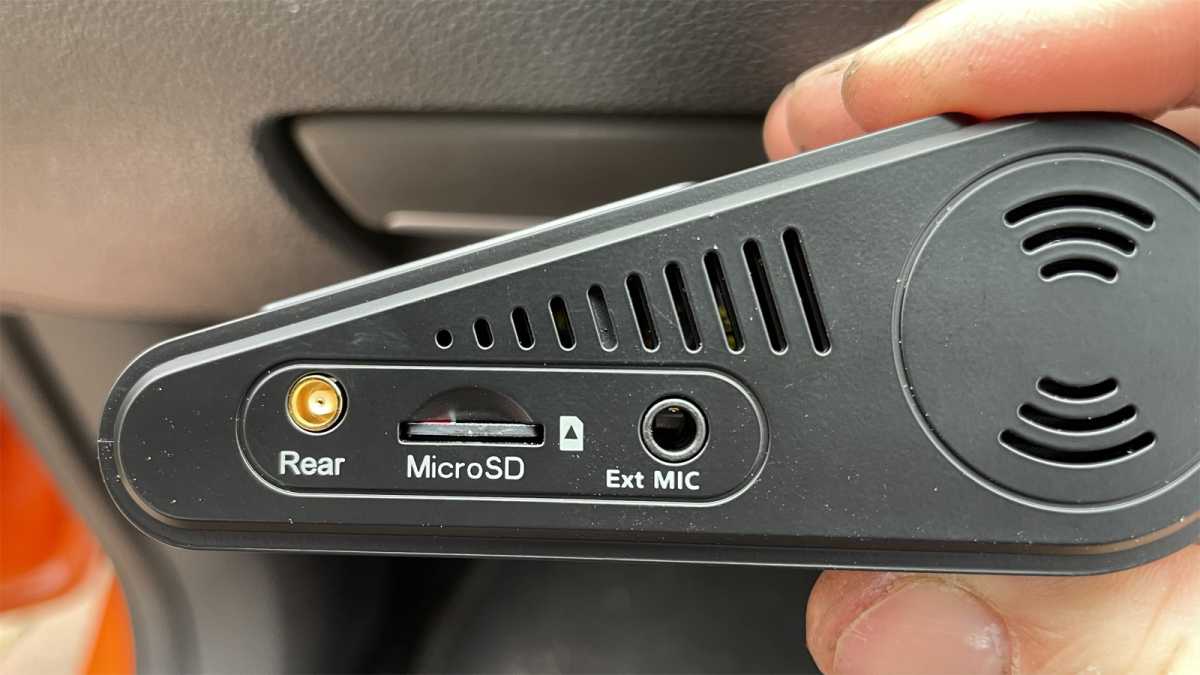
Insert a microSD card into the dash cam. You may have to supply your own – if so here are some recommendation s.
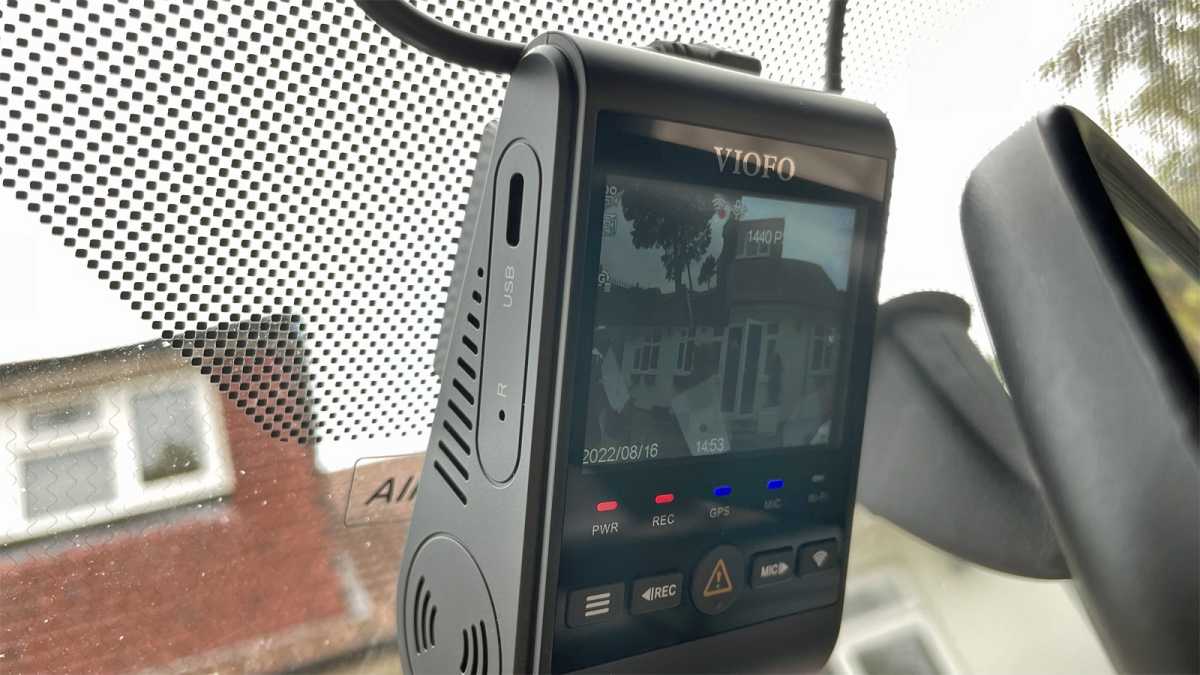
Now turn on the ignition and the screen on the dash cam should come on, or LEDs light if there’s no screen. There’s usually a start-up sound as well, to tell you the dash cam is recording without looking at it.
Jim Martin / Foundry
7. Customise the settings
If your dash cam has built-in GPS, there’s no need to set the time or date: this will be done automatically. If not, you’ll need to set this so that any video evidence will show the correct time and date. And if you live in a country with daylight saving, remember to change the clock every six months so it’s still correct.
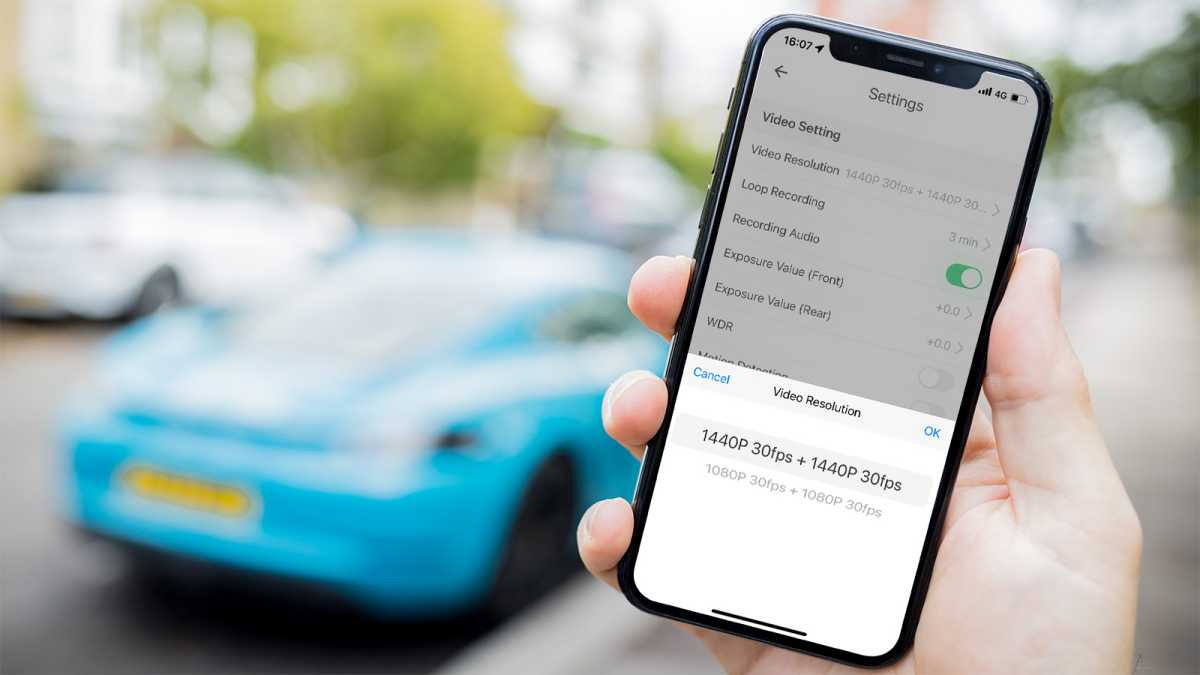
Other settings to check include how long each video clip lasts: one minute is sensible.
If the dash cam has Wi-Fi and a companion app, as the Viofo A229 Duo does, it’s easier to change those settings in the app.
Jim Martin / Foundry
You might also want to choose which information is stamped onto the video (or not) such as time, date, car registration, speed and location. The latter two will be available only if the dash cam has GPS.
8. Hard-wiring a dash cam
You may decide that you want to pay a professional to install a hard-wire kit, but it really isn’t too difficult.
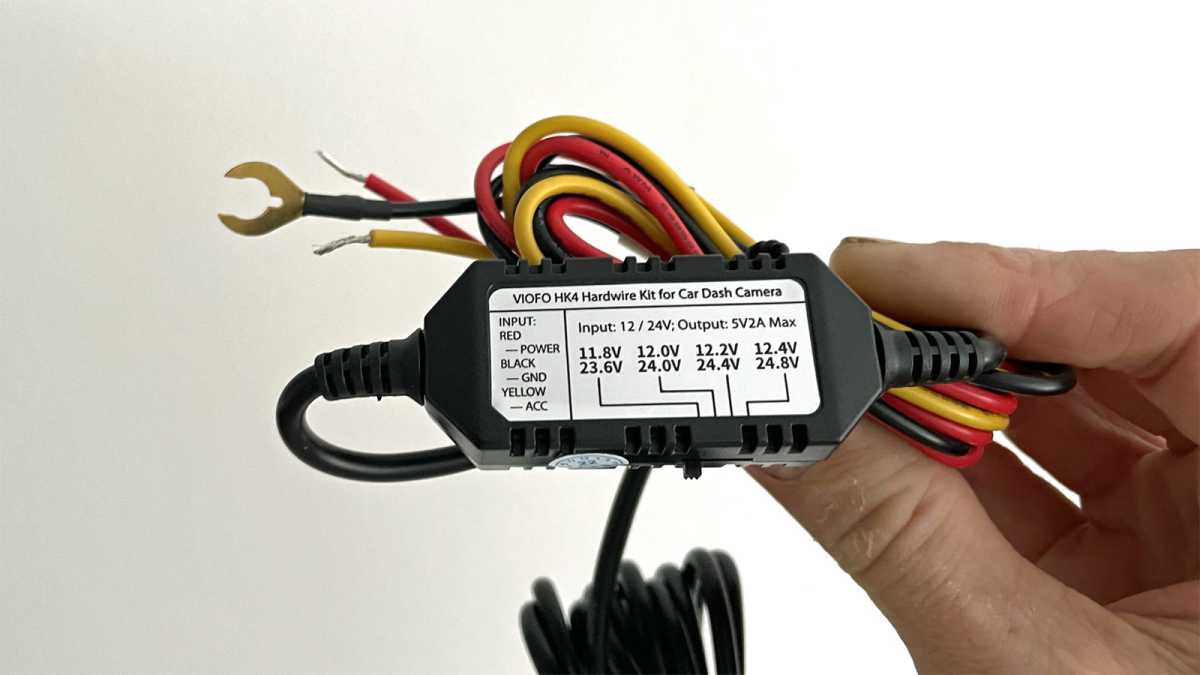
When you buy a hard-wire kit, chances are it will have two or three bare wires: red, black and potentially yellow, like Viofo’s HK4 kit here.
Jim Martin / Foundry
It will have some sort of box, which is for converting the 12V supplied from the car to the 5V that dash cams require. There may also be a sliding switch which allows you to set the minimum voltage the battery can reach before the dash cam will turn off. This prevents the battery being completely drained when you leave the car parked for a long period of time.
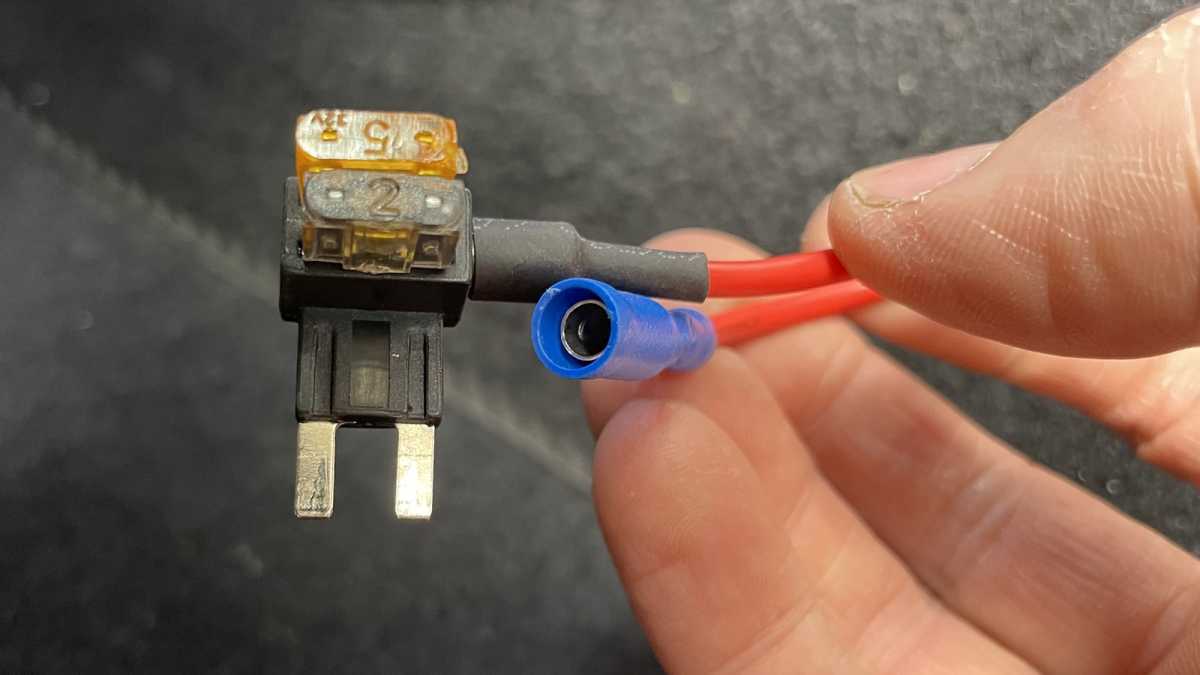
In order to connect these wires to your car’s fuse box you will need to buy so-called ‘piggyback fuse holders’.
There are three different sizes, so check which type your car uses before ordering. The holders have a short piece of wire designed to be crimped onto the wire from the hard-wire kit. If you don’t have a crimping tool, you can use some long-nose pliers or even a pair of blunt scissors.
Jim Martin / Foundry
The red wire will need to be connected to a fuse with a constant power supply – even when the ignition is off. You can find a list of fuses in your car’s manual. Look for one which supplies power even when the ignition is off.
This might be the alarm system, interior lights or something that obviously needs to work when the car is parked up.
(You can use a multimeter, if you have one, and touch the probes to the two terminals of each fuse to see which ones read 12V when the ignition is off.)
For the yellow wire, if present, this needs to be connected to a fuse which has power only when the ignition is on. This could be the radio, 12V accessory socket or something else. Again, using a multimeter will confirm which fuses are not live when the ignition is switched off.
This wire is necessary as it tells the dash cam when to switch into parking mode.
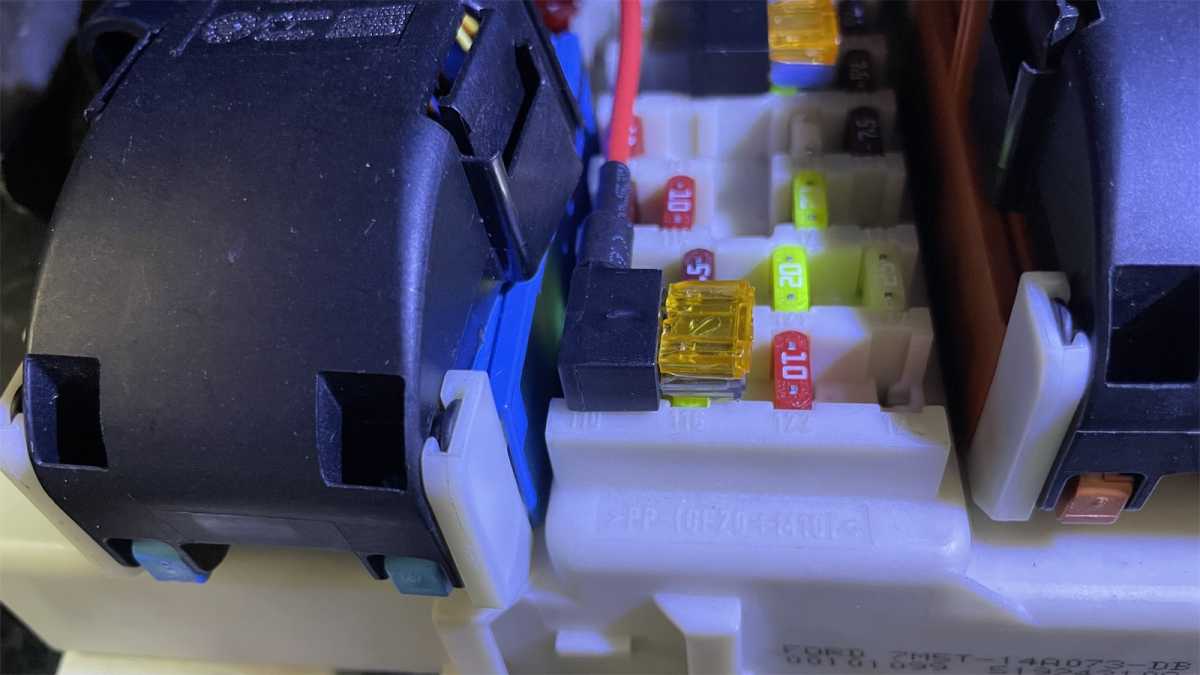
Once you’ve identified the fuses to use, locate them in the fuse box and remove them using a fuse removal tool – typically found clipped into the lid of the main fuse box in the engine bay.
Now, push your piggyback fuse holders in where the fuses were and push the fuses into the slot that’s closest to the prongs which plug into the fusebox.
Jim Martin / Foundry
In the other slot (the one furthest away from the prongs) may be a pre-installed fuse, depending upon the cables you’re purchased. If there isn’t one you’ll need to install one on each piggyback cable with a relatively low rating suitable for a dash cam, such as 5A.
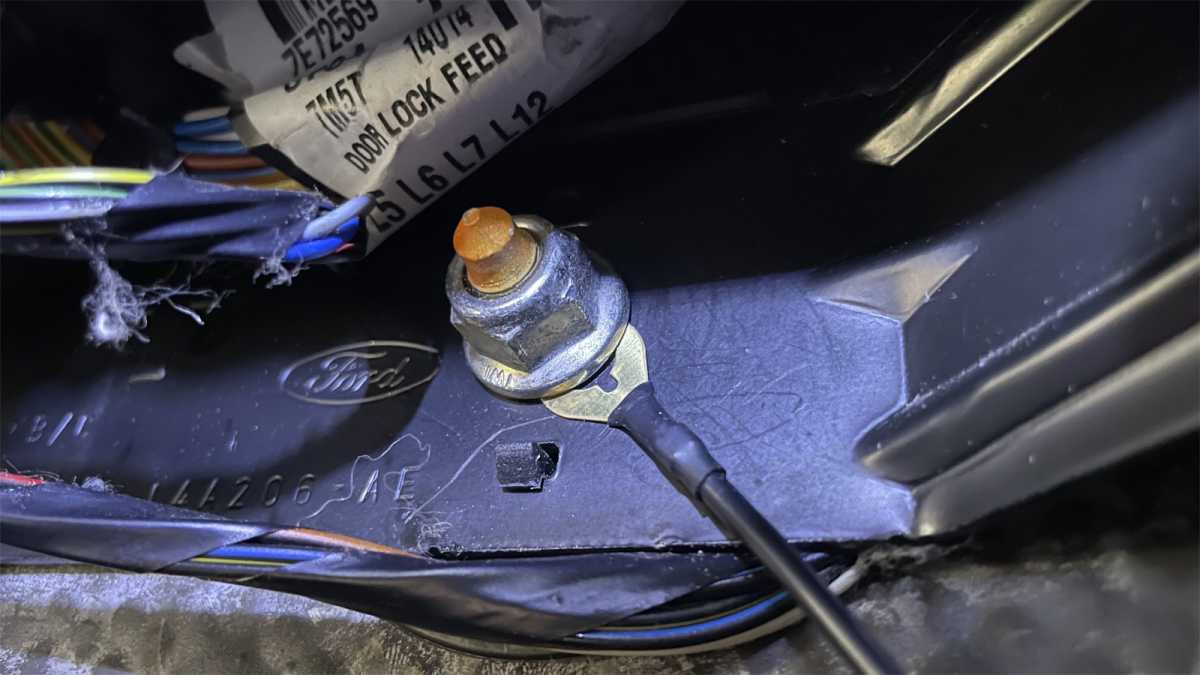
The black wire usually has a spade connector on the end, and is designed to be clamped beneath a nut that’s connected to the car’s body to give an earth connection. There’s usually a suitable one in the passenger footwell, although you may have to pull back the carpet a bit if you don’t find one.
Jim Martin / Foundry
You’ll need a spanner or socket to loosen the nut enough to slot the spade underneath it, then tighten it again.
You can install a hard-wire kit even if your dash cam doesn’t have a parking mode, but if you do that, be sure to pick a fuse for the red wire which does not have power when the ignition is switched off, otherwise it will continue recording until the car’s battery is drained.
Author: Jim Martin, Executive Editor, Tech Advisor

Jim has been testing and reviewing products for over 20 years. His main beats include VPN services and antivirus. He also covers smart home tech, mesh Wi-Fi and electric bikes.
Recent stories by Jim Martin:
- The best dash cams 2023
- Nextbase iQ review
- Nextbase launches internet-connected iQ car security camera
At a glance
Expert’s Rating
Pros
- Great monitoring features
- Impressive app
- Easy to install
Cons
- Expensive
- Subscription required for connected features
- Some features not yet available
Our Verdict
The iQ is a smart security camera you can put in practically any car and get alerts on your phone if anything happens. It’s expensive though, and there’s not much point in buying one unless you also take out a subscription. It has promise, but at the time of review was missing some of its big features.
Best Prices Today: Nextbase iQ 2K Smart Dashcam
Nextbase has spent years developing the iQ, and its launch was pushed back several times. It’s now on sale at last, albeit without a couple of key features that the company has shouted hyped up over the past 18 months or so.
However, as hard a concept as it is to sell to consumers, the iQ is meant to be an ever-evolving platform that will get new features over time.
The only problem with that approach is that this isn’t a cheap gadget and, as with so many internet-connected ones, you need to pay a subscription to use the features.. even if they’re not yet there.
There are three models in the range: 1K, 2K and 4K, starting at £349 / $499 and rising to £449 / $699. The resolutions refer to the forward-facing camera, but there’s also a cabin-facing camera, and an optional rear camera for £149 / $199 which wasn’t quite on sale at the time of writing but should be from 14 November.
Nextbase sent the 4K model for review.
Features & design
- Easy to install
- Embedded SIM
- 64GB microSD card included
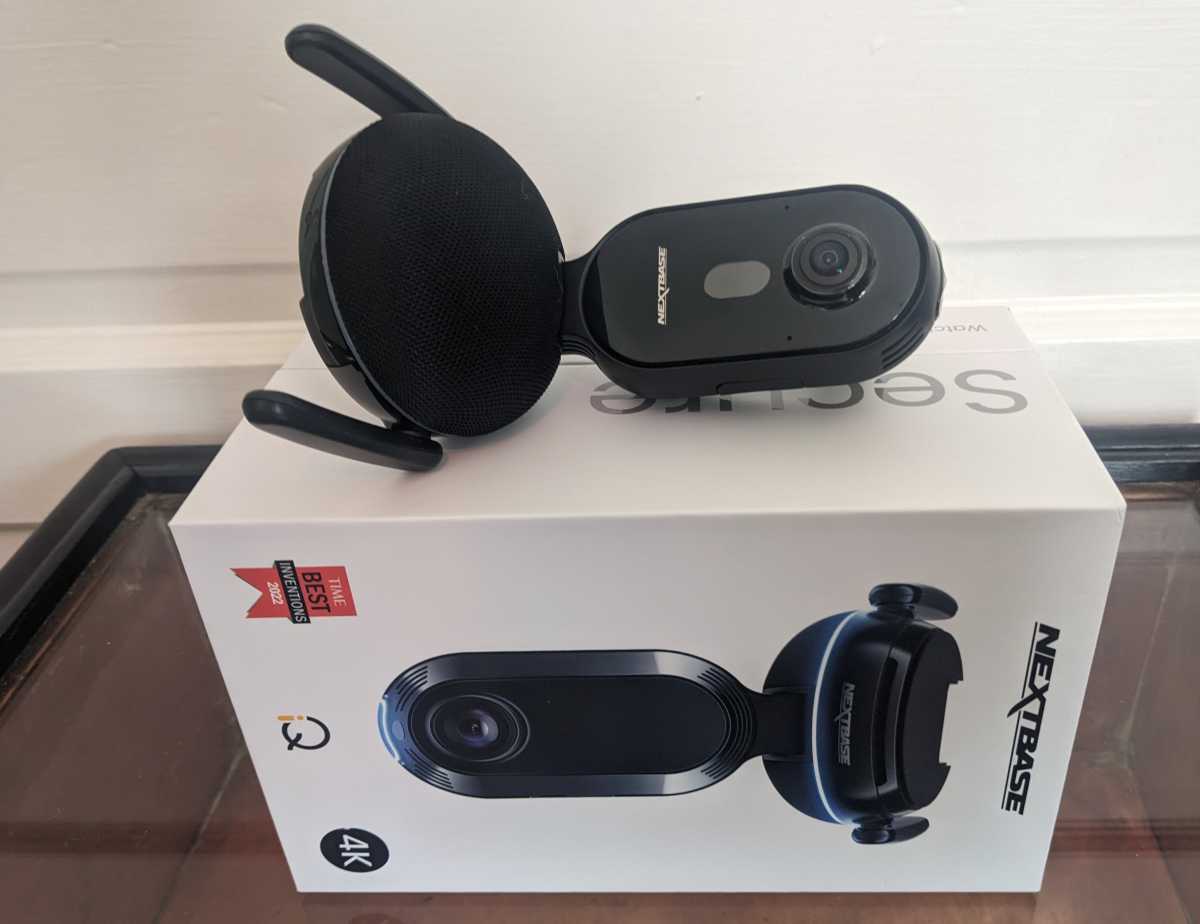
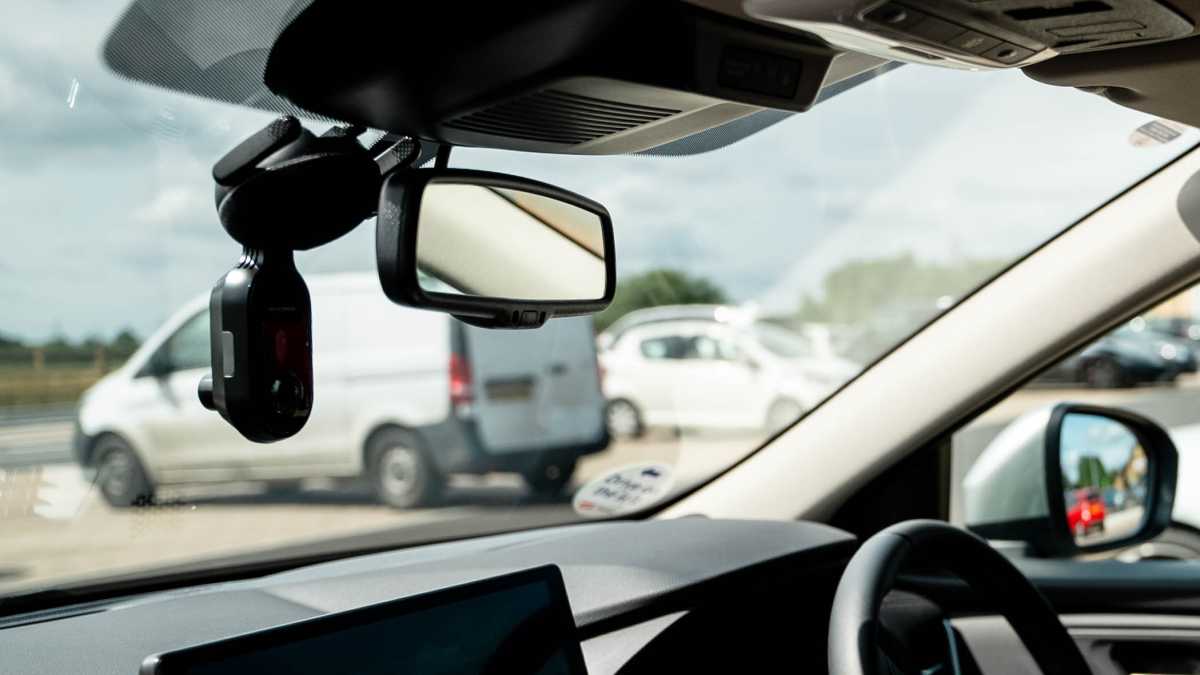
The iQ has been designed from the ground up, and that’s very obvious if you’ve seen or owned any of the company’s previous dash cams.
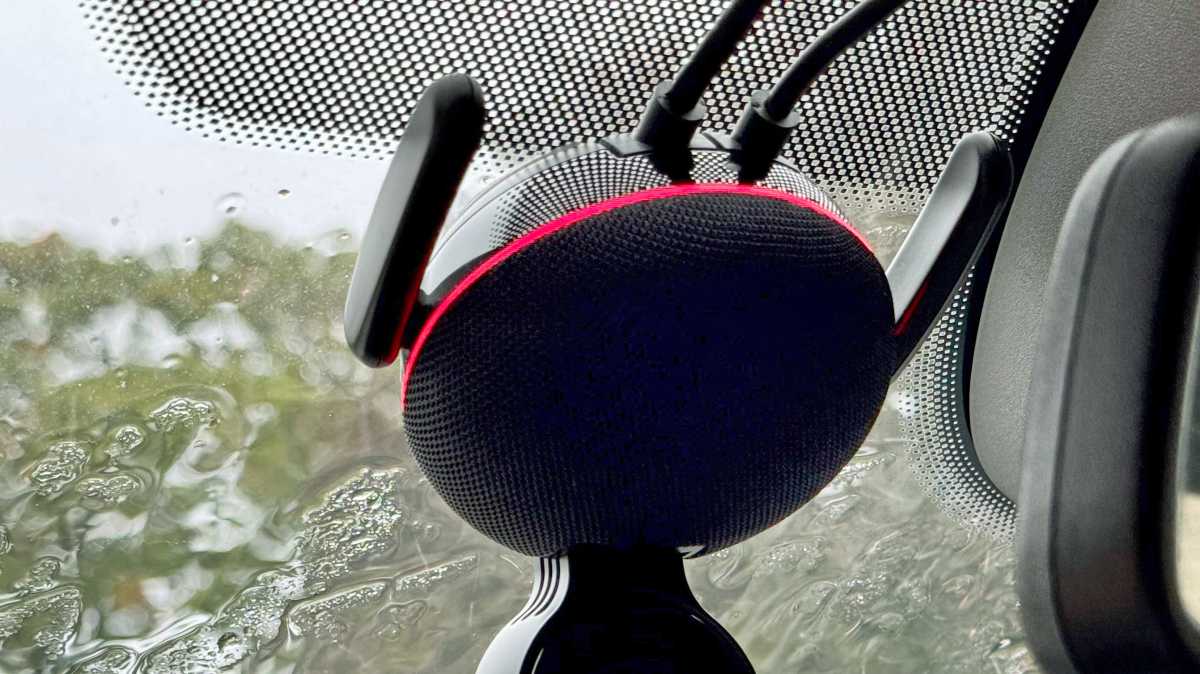
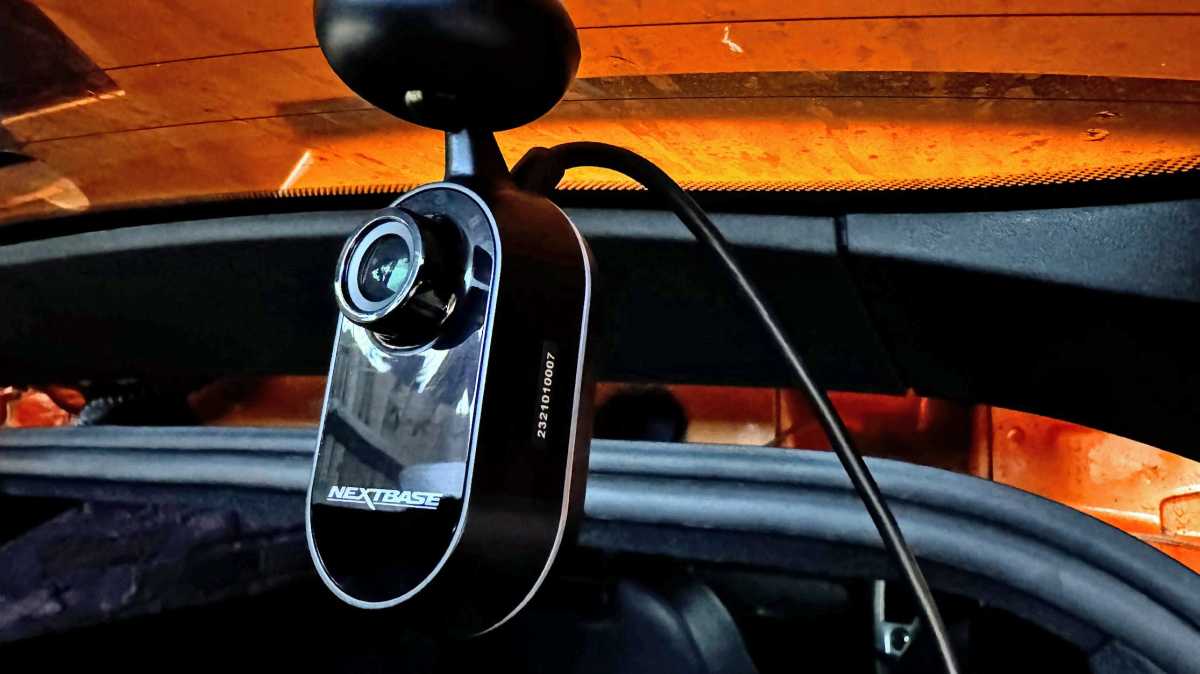
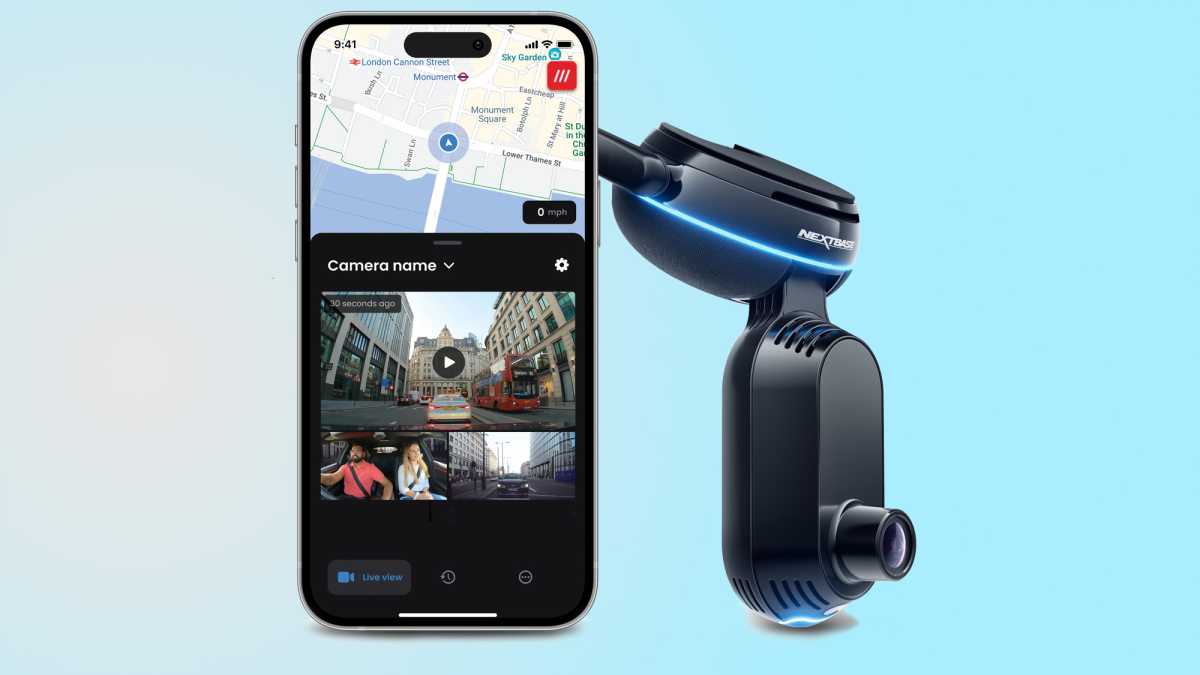
It has a fairly chunky base which attaches to your windscreen and has a fabric speaker cover much like a smart speaker. The LED ring only adds to that similarity.
Jon L. Jacobi / Foundry
The two cameras are mounted in a pendant-style unit that points downwards into the car. In your hand, it seems like it will be large and obtrusive, but when installed it really isn’t.
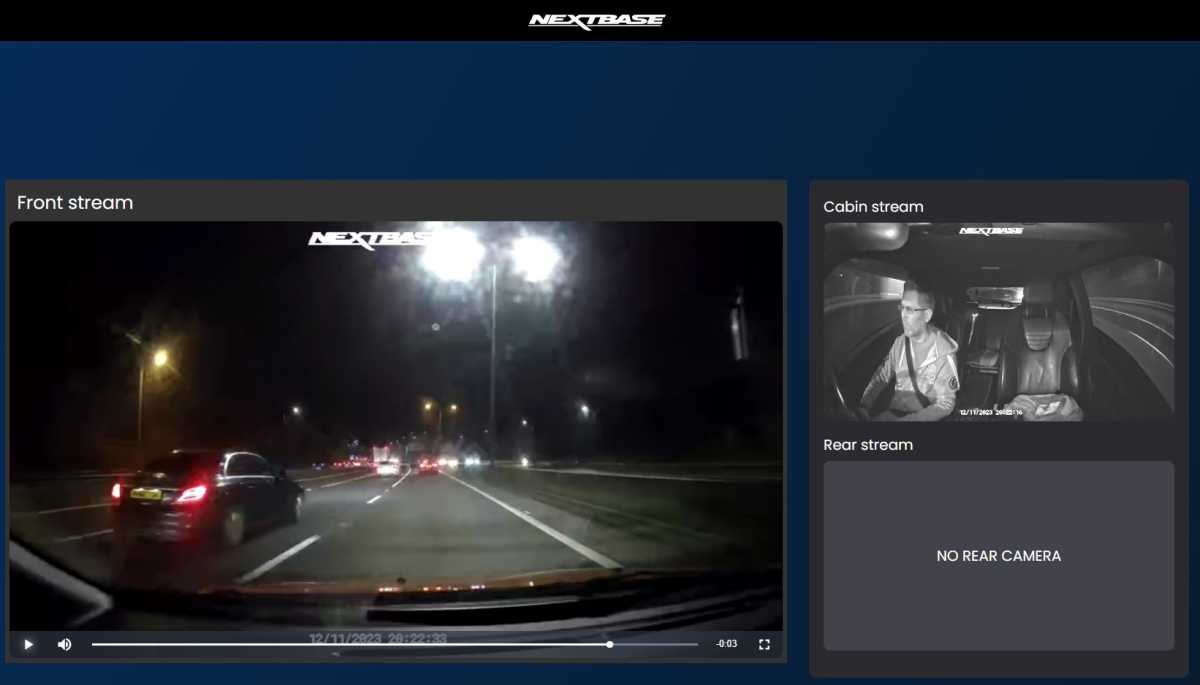
The design is necessary for the camera to get a good view of the interior and passengers. The cabin camera also has infrared LEDs so you can still see what’s going on at night when the cabin is dark.
Nextbase includes a 64GB microSD card which you shouldn’t ever need to remove from the iQ, but you can upgrade it to 256GB if you want to.
It’s used to record video like a traditional dash cam, but the iQ does way more than that, and I’ll get to that in a second.
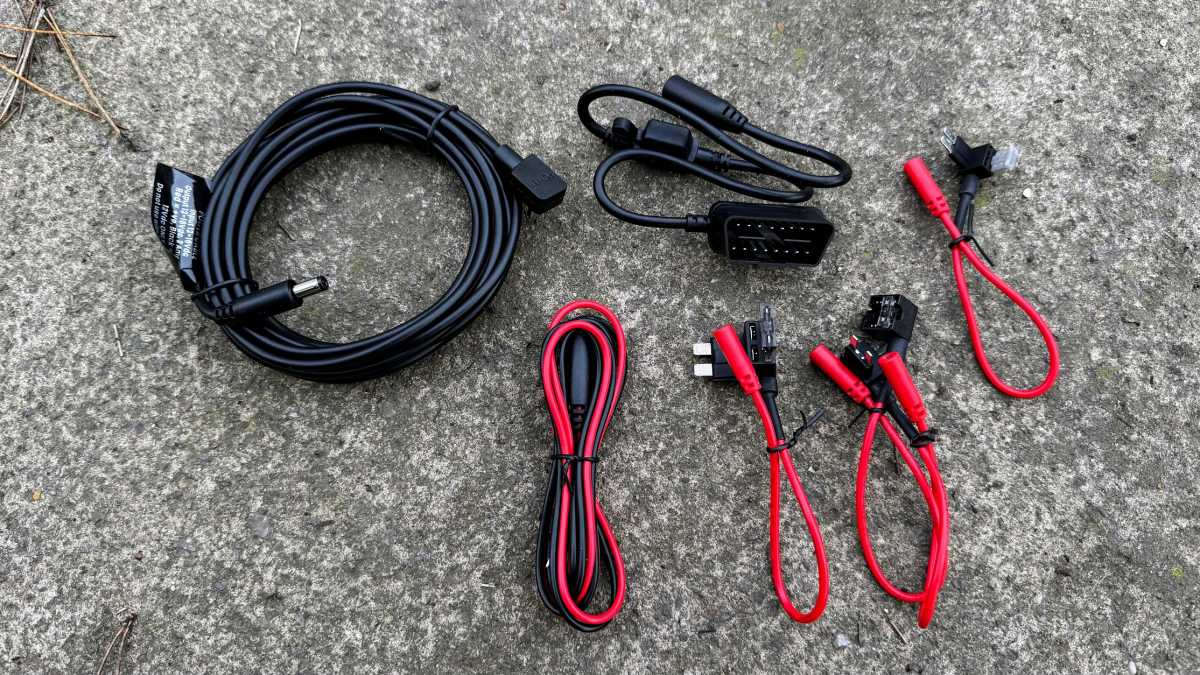
Installing the iQ in your car is simple because Nextbase includes a clever power cable that plugs into your car’s OBD II port. You might have to Google its location if you’re not familiar, but all cars since around 1996 have one.
Jim Martin / Foundry
The connector is as slim as possible so should fit behind a cover, but the cable exits from the side which proved to be a problem in my wife’s 2013 Vauxhall Corsa which has a recessed OBD II port, making it impossible to plug it in. It wasn’t an issue in my Ford Focus though.
There is a solution in the box though: fuse taps that you can connect to the appropriate fuse in your car’s interior fuse box. The only disadvantage is that you need to know which fuse to use, and to find a handy bolt that connects to the car’s chassis to which to attach the negative wire.
The only gotcha is that the adhesive mount needs to be stuck to your windscreen in a precise orientation. Rotate it slightly left or right and the iQ won’t be vertical, so it’s a good idea to offer it up with the camera attached to the mount.
Jim Martin / Foundry
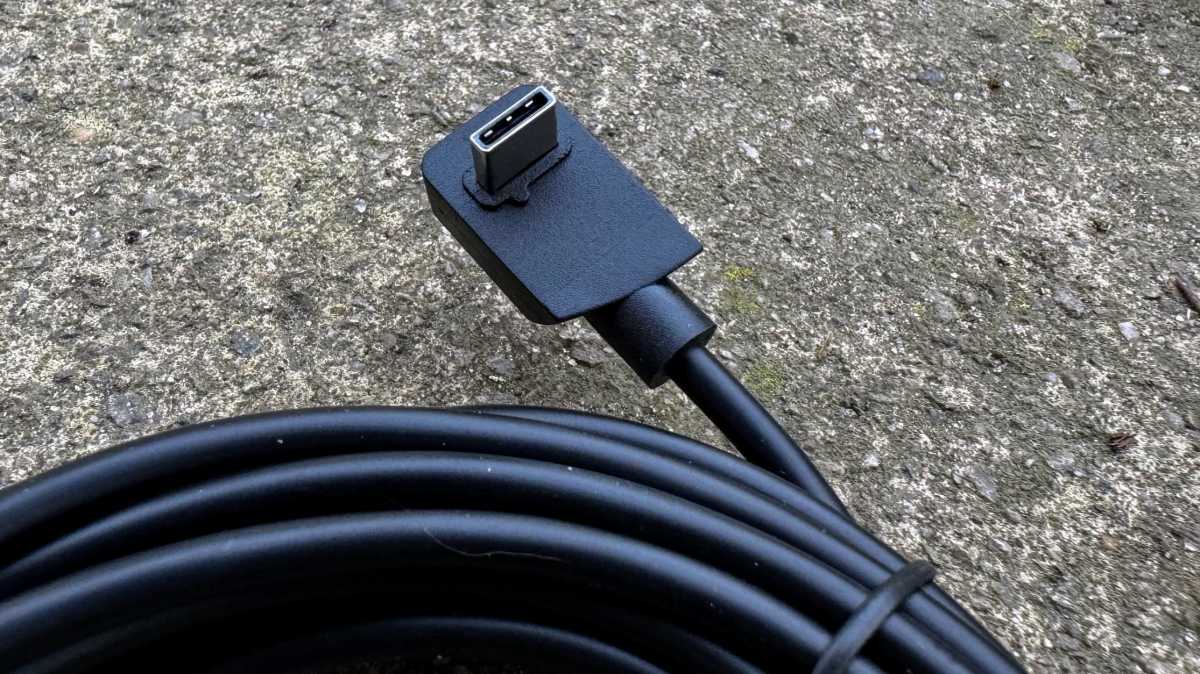
The power and rear camera cable use proprietary connectors, like squared-off USB-C, which attach neatly into the rear of the iQ.
Jim Martin / Foundry
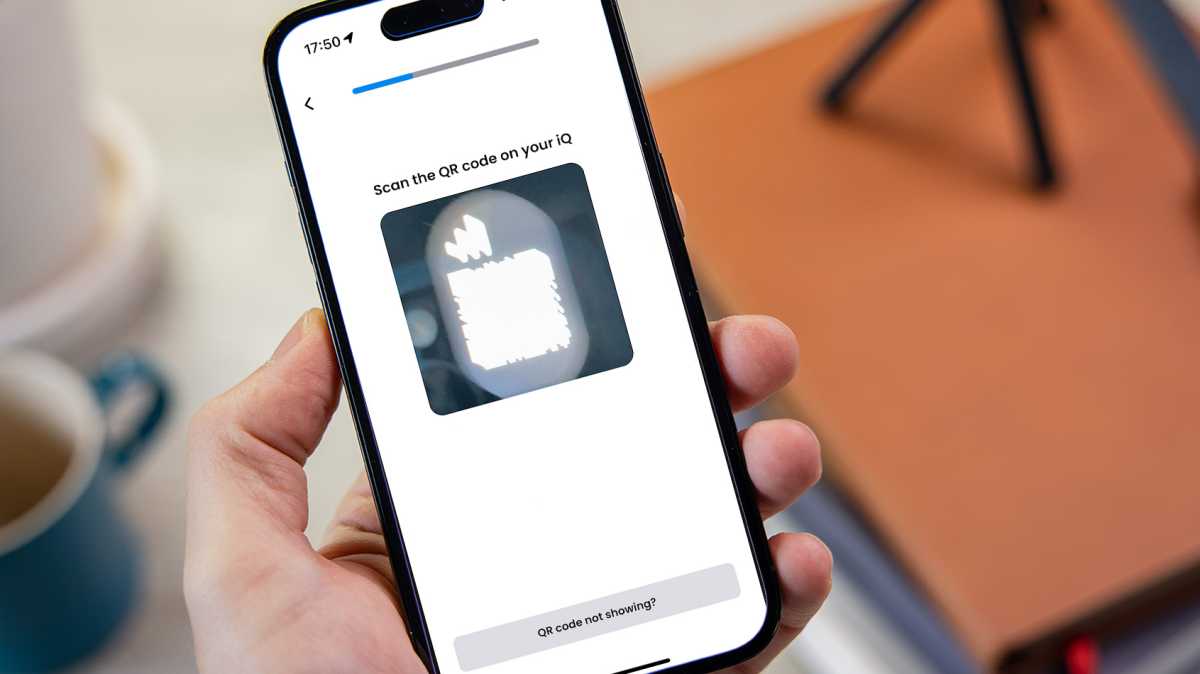
As part of the process you need to install the Nextbase iQ app on your phone and create an account. The app will walk you through the hardware installation and ask if you have a rear camera. The iQ’s data connection should activate and you’ll have to scan a tiny QR code on the iQ’s screen.
This is where the process fell down for me, as the code seemed far too bright in the preview and any slight movement of the phone caused it to blur. Using the tips provided in the app, it did eventually scan after I double-tapped the preview to turn on my phone’s rear LED flashlight and slowly move the phone closer to and away from the screen until it scanned.
Jim Martin / Foundry
If you manage to jump this particular hurdle, the iQ will download the latest firmware and restart, at which point you can see the live camera view and adjust the angle to get the best view of the road ahead (and behind if you have the rear cam).
Live view & alerts
Getting back to features, the embedded SIM means the iQ is always connected to the internet. It isn’t the first dash cam to do this, but it’s certainly the best-executed.
Via the Nextbase iQ app, which has clearly been inspired by Ring’s, and with the appropriate subscription in place, you can watch the live views from each camera and see on a map exactly where the car is along with the What3Words location.
Jim Martin / Foundry
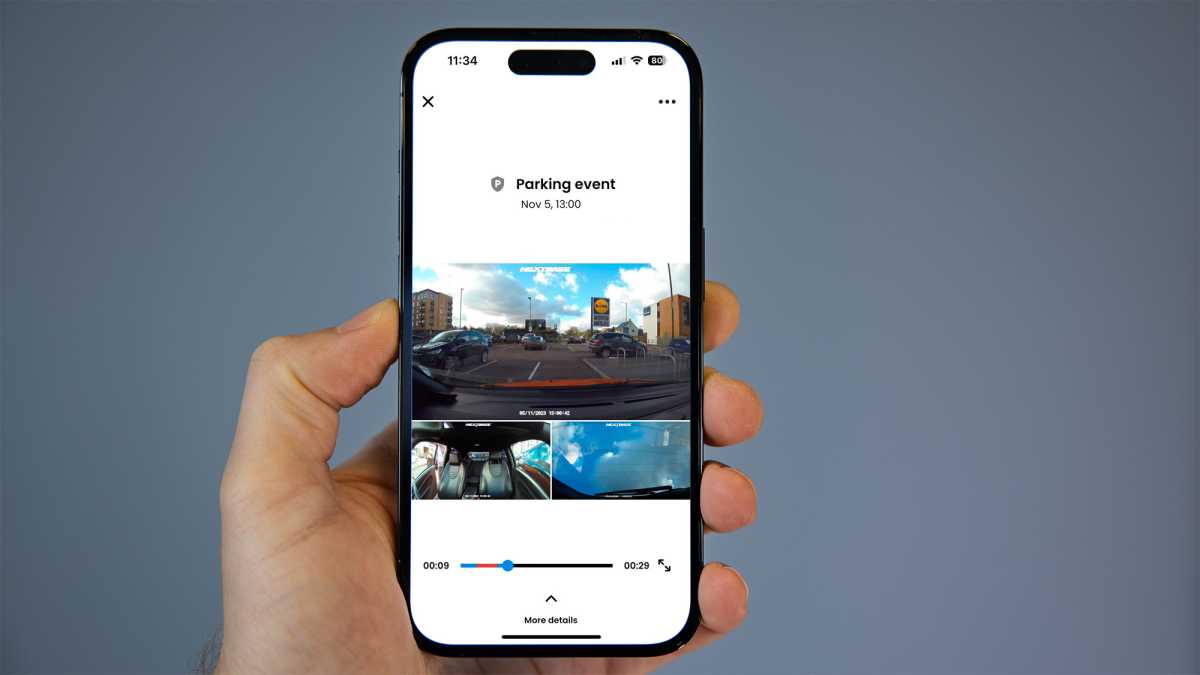
Of course, any security camera worth its salt will tell you when something important is happening and the iQ is good at it. Using a variety of sensors, including radar, it will send you notifications of “Parking events”, which could be someone reversing into your car in a car park or a person loitering with intent. I found it would also notify me when I parked up and got out of the car, and again when I returned.
You can watch the recorded event, which shows all camera views on the same screen, and a useful red highlight on the playback bar means you can skip straight to where the action happened.
Jim Martin / Foundry
These aren’t the original full-resolution versions, though. They’re standard-def 848×480-pixel clips.
In the SmartSense settings in the app you can adjust how far away in each quadrant to monitor. There’s also a setting for the ‘activation voltage’ at which SmartSense should kick in.
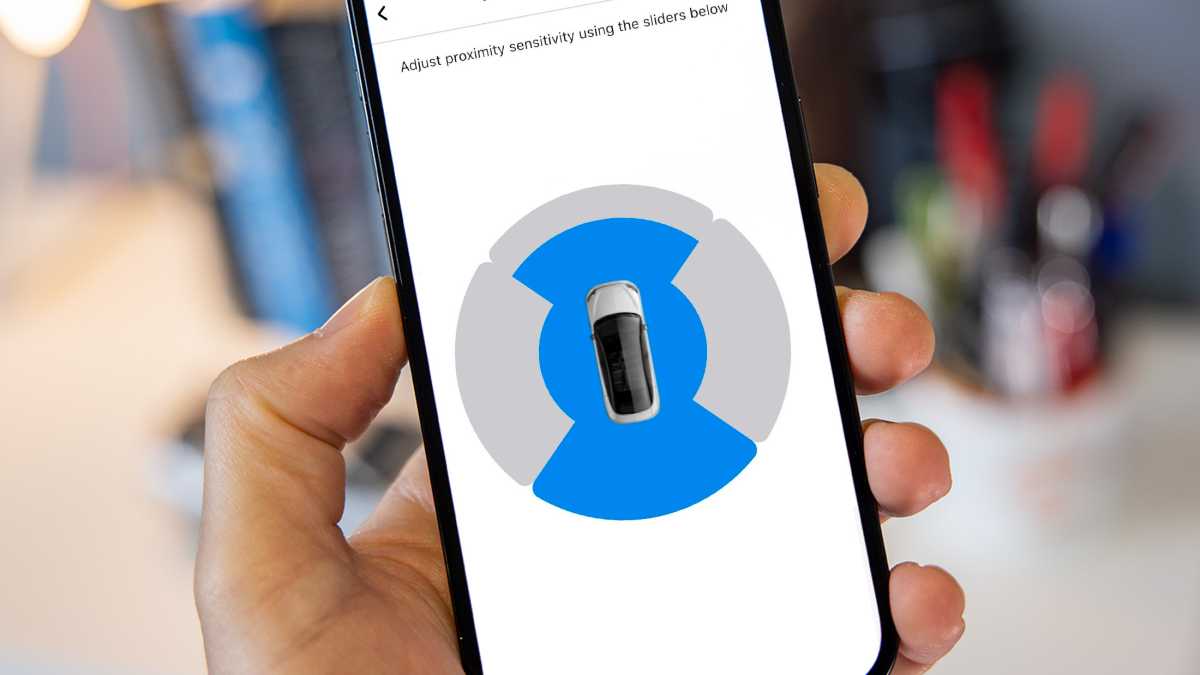
Jim Martin / Foundry
This is different from the ‘Low power cut-off’ setting which shuts off the iQ if your car battery drops below a set voltage in order to ensure it doesn’t drain so much you can’t start the engine.
Emergency SOS
One of the other main safety features is Emergency SOS, something previous Nextbase dash cams have offered. You’ll need a Protect Plus subscription to enable it.
When set up, the iQ will monitor for a “severe crash” and when it detects one it will automatically send an SOS to emergency services with your exact location and – if you’ve provided it – your medical data.
You’ll receive a call back from those services but if you’re unable to answer, an ambulance will be dispatched to your location automatically.
Voice commands
You can also say a variety of other things prefixed by “Hey dash cam” such as:
- Turn the microphone on
- Turn the microphone off
- Start recording
- Stop recording
- Lock this file
- Turn the cabin camera off
- Turn the cabin camera on
For each, your command is processed locally and there are many variations of each command so you don’t have to remember the exact phrase. They all worked reliably when I tried them while driving.
Fortunately, turning the mic off only means audio isn’t recorded – it remains on to listen for your next command.
Currently, there’s no spoken feedback: everything is communicated using alert tones and a small LCD display which shows icons – it isn’t used for showing video.
Missing features
As mentioned, a couple of features are not available at launch. One is Guardian Mode. This is designed partly for parents with young drivers who want to keep tabs on them. When it’s added, you’ll be able to set speed and location limits, and get notifications when the car exceeds or leaves them.
This is also useful if you leave the car at a garage for repair, or with a valet.
A talk-back feature will allow you to communicate with whoever is in the car, too.
The second headline feature that isn’t available is Roadwatch AI. This uses a combination of computer vision and radar to identify other road users, their speed and trajectory.
This data can then be used alongside the video itself to help prove what happened if there is, for example, a collision.
As the iQ records video using H.265, you can’t use Nextbase’s current desktop viewer as it supports only H.264, so there was no way of getting at any of the recorded meta data at the time of review.
Performance & quality
As you’d expect at these prices, quality is good, although perhaps not as good as might hope for. Resolution depends upon the model you buy. The 1K has 1080p front and cabin cameras, but the interior is recorded at 1440p if you buy the 2K or 4K models.
The rear camera records at 1440p and can be connected to any of the three models.
Jim Martin / Foundry
I tested the 4K and the quality from the main front-facing camera is generally respectable, and a step up from Nextbase’s 622. There’s lots of detail which means you can read registration plates of other vehicles, whether they’re parked or driving.
There are quite a few exceptions to this, though. At night or if the weather is bad, details can be obscured by rain on your windows, or because your car’s headlights are reflecting off number plates.
The wide field of view means cars also have to be quite close by, otherwise their plates are simply too small to see. Usually, though, you only care about these details if another car hits yours – meaning it will be very close.
As there’s no HDR, dynamic range is somewhat limited and this can cause over- or underexposure when the sun is in the frame.
It’s surprising there’s no polariser for the front or rear cameras, neither built-in nor optional. There are just two video quality settings in the app, too, one being to disable audio recording. That leaves only exposure, which can be set separately for each camera.
Here are some examples of snapshots from day and night recording from all three cameras.
In the app, you’ll find recordings split into two sections: Events and Library.
Events is the important stuff, such as impacts, motion detected while parked and manual recordings where you’ve locked a file by saying the command, or pressing the button on the underside of the iQ. All are uploaded to the cloud automatically if you have a Protect Plus subscription.
Library is where you’ll see a complete timeline of all the events along with the regular continuous clips recorded while driving along. You can download any of these clips within the app as long as the iQ has power and a mobile data signal – and you have a Protect or Protect Plus subscription.
Whenever you download something, you can pick which of the camera feeds to include: you don’t have to download all of them.
It can take a while for the iQ to wake up and start streaming video if it’s in low-power mode, but the app does a great job of telling you what it’s doing rather than merely showing a spinning circle.
Although there’s built-in Wi-Fi, Nextbase says it’s working on a direct Wi-Fi link and expects local downloading to be possible some 4-6 weeks after launch.
You can of course take out the microSD card and pop it into a card reader on your laptop or PC but Nextbase has added an HD download option in the app. Unfortunately, this is only for videos in the Library tab. It’s not an option in the Events tab, but those are the clips you’re more likely to want to download. There, you’ll see the standard-def version which are automatically uploaded to the cloud as part of a Protect Plus subscription.
Continuous recording splits clips into 30-second chunks. These are 143MB for the front 4K camera, and 86MB for the cabin and rear 2K cameras. Alongside each is a low-resolution 5MB version which is what you see in the app.
With all three cameras recording, the 64GB card can hold around 1.5 hours of footage.
In terms of power usage, I found the iQ worked fine in a car that’s used every day and has a battery that’s in good health. But if you leave it parked a lot of the time, you’ll find the iQ switches off to preserve power after a day or two and therefore won’t be able to notify you or record anything.
Price & availability
In the UK you can buy the iQ from Halfords or direct from Nextbase .
As mentioned, the 1K costs £349, the 2K £399 and the 4K £499. The rear camera is £149.
In the US prices are higher: $499, $599 and $699 respectively, and these are the same whether you buy from Nextbase or Best Buy .
It’s possible to use the iQ without a subscription: the free tier is called ‘Solo’. The only feature it includes is text notifications sent when an event has been detected. These don’t specify what type of event and as you can’t connect remotely, you won’t be able to see the live view, nor watch cloud recordings of the event.
This means a subscription is essential: without it, the iQ isn’t much different to traditional dash cams.
In the UK the cheaper Protect tier costs £6.99 per month or £69.99 per year, while Protect Plus is £9.99 or £99.99.
In the US, prices are again higher at $9.99 per month or $99.99 for a year of Protect, while Protect Plus is $19.99 per month or $199.99 per year.
Protect Plus stores events for 180 days and also adds multiple user accounts (so other family members can use the app), Emergency SOS and automatic incident backup. The latter is an important distinction: if you opt only for Protect, nothing is uploaded: you just get the option to download videos remotely to your phone manually.
For alternatives, see our roundup of the best dash cams.
Should I buy the Nextbase iQ?
The iQ is the smartest dash cam I’ve reviewed. It’s great to be able to watch the live view and see what’s going on when notifications arrive, as well as see where your car is from the GPS location.
The app is – on the whole – great and it makes the iQ easy to use. Voice commands are useful, too.
However, despite that long development time, the iQ feels like an unfinished product. There are a fair few features missing, not just Roadwatch AI and Guardian Mode but things like the ability to download full-resolution videos to your phone via Wi-Fi and watch videos alongside GPS and G-sensor data. Firmware updates, of which there have been a good few during my testing, aren’t notified: you have to go into the settings and check manually to see if there’s a new version to download.
Nextbase says it’s working hard to address these things, but there are no guarantees of when they’ll arrive.
Regardless, price is going to be the sticking point for many: paying £349 / $499 for a 1080p camera is asking a lot, and it’s a further £149 / $200 for the rear camera (which is a wise investment).
Given the relatively high subscription prices it’s disappointing that videos backed up to the cloud are so low quality and that you need Protect Plus for events to be uploaded to the cloud automatically: a feature we take for granted on Wi-Fi security cameras.
Finally, there’s the one-year warranty, which is standard for Nextbase. But with the promise of the iQ being upgraded with new features over a longer period than that, it feels too short.
Ultimately, the iQ is a great security device for your car which should improve over time. I’ve no reason to doubt that Nextbase will make good on those promises, but you might want to wait a bit until some of them are fulfilled before shelling out.
Best Prices Today: Nextbase iQ 2K Smart Dashcam
Author: Jim Martin, Executive Editor, Tech Advisor
Jim has been testing and reviewing products for over 20 years. His main beats include VPN services and antivirus. He also covers smart home tech, mesh Wi-Fi and electric bikes.
Recent stories by Jim Martin:
- The best dash cams 2023
- Nextbase launches internet-connected iQ car security camera
- Viofo A229 Duo review: 1440p front + rear video
Nextbase officially announced the iQ at CES 2022. It’s a new range of dash cams that do more than simply recording when you’re driving and parked up.
That’s because it’s also a security camera for your car. And no security device would be much use if it couldn’t notify you of critical events. So one of the iQ’s key features is internet connectivity, but it has a bunch of other features as well.
It isn’t the only dash cam to have a built-in SIM – Blackvue’s DVR750 and Thinkware’s T700 LTE already have them – but the iQ does more and offers higher resolution video.
How much does the Nextbase iQ cost?
There are three models:
- 1K – 1080p resolution – £349
- 2K – 1440p resolution – £399
- 4K – 2160p (UHD) resolution – £449
All three have two cameras, one facing the road in front, and one facing the cabin. The cabin camera on the 4K model records at 1440p, not 4K. A 1440p rear camera will be available in the near future for £149, and this mounts in your rear window for a clear view of what’s happening behind.
In the US, subscription costs are higher. Protect costs $9.99 per month or $99.99 annually, while Protect Plus is $19.99 per month or $199.99 per year.
When is the Nextbase iQ release date?
Developing the IQ took longer than expected: the company had originally said it would go on sale before the end of 2022, then pushed it back to spring 2023.
The iQ was finally released on 30 October 2023.
You can buy an iQ immediately from Nextbase , or from Halfords in the UK.
Nextbase
What are the Nextbase iQ’s features?
At launch the iQ has the following features, but Nextbase has always said this is just the beginning and it plans to add new features regularly in the future.
- Smart Sense Parking : Using a combination of radar and g-force sensors, you get notifications (with images and video) when someone is acting suspiciously around your vehicle
- Driving/Security Mode : The iQ automatically switches between driving and parking modes, connecting to either your car’s OBD II port, or using the included hard-wire kit.
- Witness Mode . Activated using your voice, this records any incident and uploads the recording to the cloud and shares it with an emergency contact or designated third party in real-time.
- Live View: Just like a home security camera, you can watch the live camera feeds at any time via the Nextbase iQ app.
- Event notifications: Sent in real-time for events you’ll care about such as when someone reverses into your car in the car park or when an intruder attempts to enter your vehicle. Fast wake-up means you won’t miss anything important.
- Remote Alarm: Via the app you can set off the iQ’s built-in alarm to deter intruders.
- Emergency SOS : Alerts the emergency services with your location and other critical details following a serious accident.
Future features, which are already well into their development, include:
- Guardian Mode: Sends a notification when your vehicle exceeds a set speed or location, useful for parents wanting to keep tabs on young drivers.
- Push to Talk : This lets you to speak to anyone in the vehicle, whether your kids or an intruder.
- Roadwatch AI : Tracks the speeds and trajectories of other vehicles around you, as well as pedestrians, cyclists and e-scooters, providing warnings to the driver and evidence that can help prove who was at fault in the event of a collision.
Another feature on the horizon is Driver Aware. Also known as DMS, this will monitor the driver using infrared sensors and provide alters to combat distracted and/or drowsy driving.
Nextbase
Nextbase iQ subscriptions
As mentioned, there are three options. Solo is free, but doesn’t allow you to connect to the iQ remotely to see live or recorded video. Here’s how they compare. Any marked with an asterisk means those features are coming soon:
Solo – Free
- Nextbase iQ app
- Voice control
- Real-time text notifications
Protect – £6.99 per month or £69.99 annually
- Nextbase iQ app
- Voice Control
- Real-time image notifications
- Live View (60 minutes)
- Smart Sense Parking
- Witness mode
- *RoadWatch AI
- *Guardian Mode
- Remote Alarm
- Cloud Storage – 30 days
Protect Plus – £9.99 per month or £99.99 annually
- Nextbase iQ app
- Voice Control
- Real-time image notifications
- Live View (120 minutes)
- Live View Look Back
- Smart Sense Parking
- Witness mode
- *RoadWatch AI
- *Guardian Mode
- Remote Alarm
- Cloud Storage – 180 days
- *Multiple User Accounts
- Emergency SOS
- Automated incident back-up
We’re reviewing the iQ and will have a full review soon. If you need recommendations of more affordable models, here are the best dash cams to buy .
Author: Jim Martin, Executive Editor, Tech Advisor
Jim has been testing and reviewing products for over 20 years. His main beats include VPN services and antivirus. He also covers smart home tech, mesh Wi-Fi and electric bikes.
Recent stories by Jim Martin:
- The best dash cams 2023
- Nextbase iQ review
- Viofo A229 Duo review: 1440p front + rear video
