You’ve got an A4 printer and you want to print a picture so that it completely covers the A4 sheet. It’s a reasonable request, but it can be tricky – or even impossible – to achieve depending on your printer and the software you’re using.
Here, we’ll explain what you need to do to print pictures at just the right size.
Borderless printing limitations
Unless you have a ‘photo’ printer, you might be stuck with small white borders around the edge of the picture even if the print preview in software shows it completely covering the paper.
That’s because a lot of printers simply don’t support ‘borderless printing’. So, you need to check your printer’s manual, or dig around in the Printing Properties settings to see if you can enable fully borderless printing.
Each printer manufacturer tends to design its own print options software, so they’re all different. Hunt around in the various tabs and see if you can find a ‘Borderless’ tickbox, or a print mode. It may even be listed as a paper size in its own right.

To get to the printer properties, use the Start menu search box to find ‘Printers’, or open the Control Panel and go to Hardware and Sound, then find printers.

Right-click on the appropriate printer if there’s more than one in the list, and choose Properties (or Open if you’re using Windows 10). If this brings up a basic-looking Windows dialog with no options, it’s probably because you haven’t installed the printer drivers and Windows is using its own.
In that case, you need to go to the manufacturer’s website and download the correct drivers for your version of Windows.
Also check out our troubleshooting tips for when your printer won’t print .
How do I print a picture in Windows?
There are lots of applications which can print pictures, including Word and PowerPoint, Microsoft Paint and Photoshop.
But you can print from Windows Explorer (File Explorer in later versions of Windows).
Simply find the picture you want to print, right-click on it and choose Print. Note that you can select multiple pictures to print at once if you want to print a collage or more than one per sheet of A4.

Now you’ll see the Print Pictures wizard. Here you can choose the printer, paper size and – most importantly, what size you want the picture to appear on the sheet.
By default ‘Full page photo’ is selected, and there’s a tick box at the bottom that automatically crops the photo to fit the paper if its aspect ratio doesn’t match (which it probably won’t).

There’s also an Options… link at the bottom right which lets you access the printer properties to change other settings, such as the paper type (you might be printing a photo on glossy paper, but by default, it will think you’re using plain paper).
When you’re ready, click Print.
Word
If you prefer to use Word, you can insert your picture a couple of ways. Also, in ‘Page Setup’ you can reduce all the margins to 10mm and ignore offers from Word to resize the margins when you close the window.
One method to insert a picture into Word is to copy your image. Then open the Word document into which you want to paste it and in the Edit menu choose Paste Special.
In later versions of Word with the Ribbon, the Paste tool is the first one in the Home tab. Here, you don’t need to use Paste Special – just click the Paste icon.

If you’re using an older version, in the Paste Special menu choose ‘Picture’ and OK. The picture will appear. Click on it to highlight then click on ‘Format’ in the Word toolbar and in the drop-down menu click on ‘Picture’ or ‘Object’ (they are alternatives depending on the origin of the image).
In the resulting dialogue box click on the ‘Wrapping’ tab and set your choice to ‘Square’. Select the dimension boxes for ‘Top, Bottom, Left, Right’ to something suitable, like 0.4cm and click OK.
Use the corner handles on your image to drag it to the size you want by eye, it will retain its proportions, and if you want to add text this will surround the image as you type because of the ‘Wrapping’ feature.
Insert image
The other way is to open your Word document and click on Insert on the tool bar (or Ribbon). Choose ‘Picture’ and then ‘From file’, then navigate to the image.
Again, if you’re using a later version, just go straight to the image you want. Click OK. The image will appear the right size in your document and you can then ‘Format’ it for Word Wrapping as before and resize it to suit.
Both these methods work well, the copy-andpaste method is more convenient when you are actually working on an image and have it in your image editor there in front of you, and the ‘Insert’ method is best for ready-to-print photos already saved in a folder.
Author: Jim Martin, Executive Editor, Tech Advisor

Jim has been testing and reviewing products for over 20 years. His main beats include VPN services and antivirus. He also covers smart home tech, mesh Wi-Fi and electric bikes.
Recent stories by Jim Martin:
- The best 3D printers 2024
- Creality K1C review
- Bambu A1 review
Printers are great when they work, but when they don’t it can be extremely frustrating. Here’s how to solve some of the most common problems, including not printing at all through to blocked nozzles and other issues.
Printers can run reliably for many years and thousands of prints, but they can also malfunction or stop working entirely.
Sometimes the reason is as simple as over- or under use. Many people don’t use their inkjet printers often enough and this can lead to problems with dried-up ink blocking the nozzles. Overuse is less common than misuse: paper clips, hair bands and even food can fall into printers and cause paper jams (and worse).
If your printer can’t be fixed with these tips, check out our list of the best printers to buy, and the best printer deals right now.
My printer won’t print
There are many reasons why your printer won’t print, so start with the basics such as checking to see whether there is an error message or warning light on the printer. Make sure there is paper in the tray(s), check the ink or toner cartridges aren’t empty, the USB cable is plugged in or the printer is connected to Wi-Fi.
And if it is a network or wireless printer, try using a USB cable instead. In our experience, some Wi-Fi printers are unreliable in terms of their connection. So it’s worth unplugging your printer and any powerline network adapters it’s connected to, then turning everything back on again.
Select the right printer!
Sometimes the reason a printer won’t print is because you’ve installed some software which has a ‘virtual’ printer and this has set itself as the default. When you hit Print, a file will be saved by this virtual printer instead of the document being sent to your physical printer.
To check this, open the Control Panel from the Start menu. Then go to Devices and Printers, right-click the correct printer to use and set it as the default. (While you’re there, you can also ensure the printer’s status is set to Ready. If not, this could be the source of the problem.)
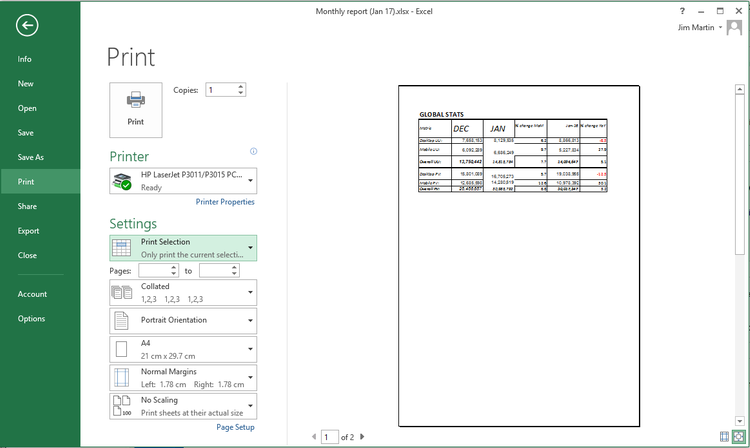
Next, make sure that the correct printer is selected in the program you are printing from – you should see an option to choose from a list as in the image below.

Microsoft has a printing troubleshooter that can help to identify problems. Click the Fix it button, download and run the program, then follow the steps in the wizard.
You can also open the Control Panel, Devices and Printers, right click the printer icon and select Troubleshoot. It doesn’t always help, but it’s worth trying.

HP has a Print and Scan Doctor to identify problems, and Canon has lots of great videos on its website – click your printer model and then click the Troubleshooting videos link.
Why can’t I print from my phone or tablet?
To print from an iPad, iPhone or iPod Touch, the printer must have Wi-Fi and also support AirPrint. The list of AirPrint printers is growing, but there are still a lot of printers, particularly older models, that don’t support it.
If you have a Mac with a printer attached, you can turn it into an AirPrint printer using HandyPrint . Printer Pro is an app for iOS devices that enables them to print to many wireless printers or a wired one attached to a PC or Mac.
Some Samsung phones, tablets and printers are designed to work together and printing is straightforward. Samsung also has its own app for printing to its printers, including from iPhones.
To print from any Android phone or tablet to any PC-connected printer you can use Google Cloud Print.
Install Cloud Print on the mobile device from the Google Play store . Next, using Google Chrome on your PC, go to the menu, Settings, Advanced Settings and click Manage. You can then add the printer attached to the PC. Provided the PC and printer are switched on, you can print from the Android device.
Do I need to replace the cartridges?
Printers warn that the ink is running out before it actually does. If you print only occasionally the remaining ink or tonermight last another couple of weeks, if not months.
Order new cartridges as soon as the message appears, but don’t install them until it either stops printing or the colours fade. A trick with laser printers is to remove the cartridge that’s running low and shake it gently from side to side. This sometimes allows the rest of the toner to be used. In other cases a counter is used and once a certain number of pages has been printed, the cartridge will be deemed as empty.
HP has an interesting scheme with many of its printers where you pay per month and cartridges automatically arrive at the right time.
If your colour ink has run out, but you must keep printing, you might be able to set your printer to print in black and white only. This is a setting you’ll find in printer properties in the Control Panel – or click the option when you go to print via an application you want to print from.
Why won’t web pages, Excel documents and photos print properly?
Web pages
Web pages can be any size and they aren’t limited by the width or height of the paper in your printer. They aren’t usually designed to be printed, which is why problems can occur.
Much of the time you will find a shrink-to-fit option in the printer settings that helps when your document or photo is just a bit too big to fit on the page. Some web pages, such as those with printable coupons, have a print button within the web page. Use that and not the print menu in the browser.
Office documents
If you’re trying to print an Excel sheet, be sure to select only the cells you need to print before clicking Print. Then you can choose ‘Print selection’ and change the other options to make sure it fits well on an A4 sheet. You can do other things, such as reducing the size of the margins, and switching from landscape to portrait orientation.
Similarly, when printing a Word document or any other, you can usually specify which pages to print so you don’t have to print them all.
Photos and pictures
For photos or images you want to print, it’s usually best to right-click on them in Windows Explorer and click Print. This way you will get to choose how large to print each photo.
If you select multiple photos in a folder, then right-click and choose Print you will be able to print them all at once, with more than one per sheet of paper (and you can choose the paper size here too). It’s similar to the ‘n-up’ option that you’ll find in Printing properties which allows you to print multiple pages of a document on a single sheet of A4.

Why does my printer say “Error”?
There are a few possible reasons, but the most common is to do with paper. T he first thing to check is whether the input tray is empty, but it’s also worth checking for paper jams. If you find one, try to work out why it’s happening rather than just pulling out a crumpled piece of paper from the paper tray and assuming you’ve fixed it.
Take the paper out of the tray, open all the flaps and look inside. You might need a torch to see the paper and long tweezers to reach it, especially if it’s only a very small piece which has been ripped off and left inside.
Look underneath the printer because there may be an access panel that can be removed to examine and clean the paper feed mechanism.
Old paper can absorb moisture, which makes it stick and then it is pulled through two or more sheets at a time. Keep it in a bag until it is needed. Check out Canon’s troubleshooting videos to see how to remove pieces of paper stuck in printers.
Also, try using thinner paper: most home printers will only handle photo paper at a maximum. They can’t usually print on card as it’s too stiff to be fed around corners.
Why is the print quality poor?
The nozzles on inkjet printer heads can become blocked causing horizontal streaks on prints and poor or wrong colours. Cleaning the print heads can solve the problem. The procedure varies from printer to printer and there may be an option on the printer control panel or in the printer software on the computer.
You might need to look this up in the manual. In your printer’s properties (either in an app or in the Windows Control Panel) you might find a maintenance section.

The type of paper affects the print quality and photocopier paper might be letting you down.
It can be too absorbent and inkjet ink soaks into it like blotting paper. Buy good quality paper for the best prints, and this is usually from the printer manufacturer itself, particularly for printing photos.
Laser printers are less dependent on paper, and smudges or spots in the same place on each page usually mean there’s dirt somewhere in the printer, typically on the ‘drum’.
Be very careful when cleaning the imaging drum, using only isopropyl alcohol and a soft lint-free cloth.
Read the manufacturer’s guidance on how to remove and clean the drum, which is often called an OPC.
We’ve also written a guide on how to match the colours on your screen to your printer.
Just a few years ago, 3D printing was a hobby for geeks and nerds. It was difficult, frustrating and slow.
Fast forward to 2024, and that has all changed completely. Now, you can buy – for a very reasonable sum – a printer that works out of the box, doesn’t require hours of tweaking and adjusting and prints large models in hours – not days. Small models can take mere minutes.
Since you’re reading this, you’ve probably made it past the point of wondering what on earth you’d use a 3D printer for, but if not, there are many useful tools and gadgets as well as fun things to print, all of which are available to download free from sites such as Thingiverse and Printables .
Here we’ll explain what to look for in a 3D printer and recommend what you should buy.
First, a brief word on colour: consumer 3D printers are single-nozzle devices which print one colour at a time. If you want to multicolour prints, then Bambu’s P1S Combo and A1 Combo can hold four spools of filament and change colour automatically. Multicolour prints can take a long time, though, and waste filament.
One other thing: until you’ve spent time getting to grips with a 3D modelling app such as Fusion 360 or Tinkercad , you’ll be limited to printing objects that other people have designed. There are lots of them, but if you want something bespoke, you’ll have to create it yourself.
Don’t be put off buying a 3D printer, though. Choose wisely and you’ll be rewarded with a device that can print intricate, articulated models from the off.
We’re focusing mainly on FDM (fused deposition modelling) printers here because these are the most popular type. The other type is a resin 3D printer, such as the Creality Halot One Plus, which works very differently, and are designed for printing small, intricate, solid models.
Best 3D printers 2024
1. Bambu P1S – Best 3D printer for most people
Pros
- Excellent print quality
- Automatic colour changing
- Fast CoreXY motion system
Cons
- Basic non-touchscreen control panel
- Filament wastage can be high in multicolour printing
- No failed print detection
With so many tech products you get what you pay for. This inevitably means the “best” will also be the most expensive. It’s certainly the case here, but just because the P1S is expensive doesn’t mean it isn’t good value.
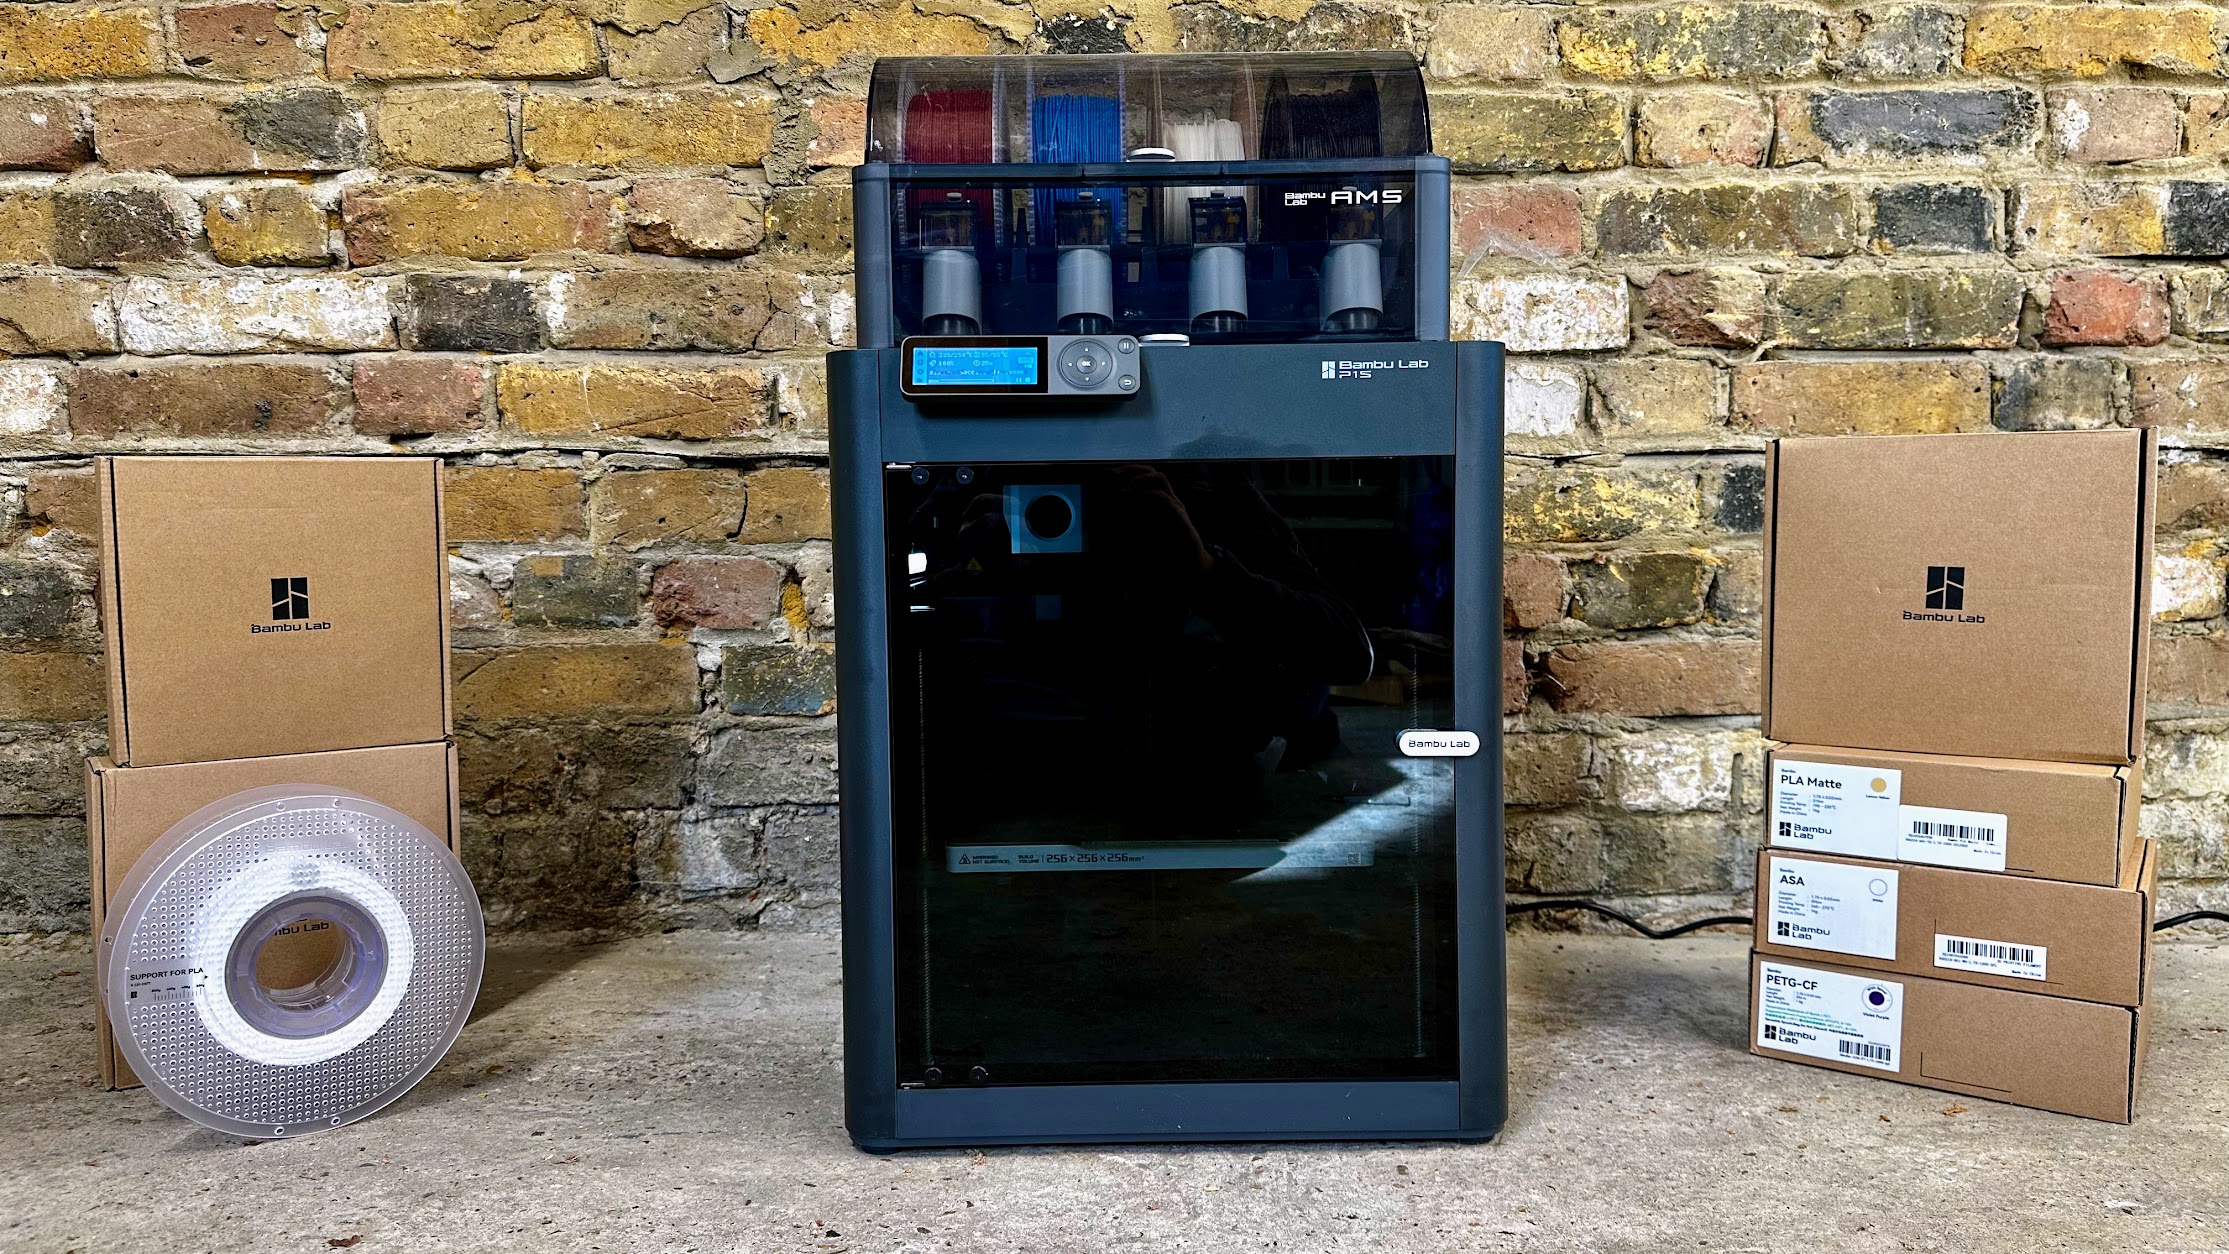
If you buy the P1S Combo, it will come with an AMS, a unit that sits on top of the printer. It holds four spools of filament and can load and unload them automatically and print in multiple colours without any assistance from you.
With only one nozzle, multicolour prints aren’t exactly fast. But the AMS also takes the pain out of changing filament when you want to print something in a different colour to the previous print.
If you don’t care about multicolour, you can buy the non-Combo version of the P1S for quite a bit less.
Overall, the P1S is a remarkably good printer. It’s really fast thanks to the use of a coreXY system, and as it’s fully enclosed it’s reliable even when printing with ASA, nylon, polycarbonate and other filament types because of the stable internal temperatures. More importantly, print quality is absolutely superb.
If there’s a downside, it’s the rubbish dot-matrix screen which seems very out of place on a printer this expensive. But, there are other ways to control the P1S, such as printing from a PC or phone via Wi-Fi. The Creality K1C is a good alternative if you must have a touchscreen, and it also has a few other features such as failed print detection.
If you just want to print with PLA, PETG and other filament types that don’t require an enclosure, take a look at Bambu’s A1 which is a lot cheaper.
Read our full Bambu P1S Combo review
2. Bambu A1 – Best budget 3D printer
Pros
- Fast, reliable printing
- Fully automatic levelling
- Excellent value
Cons
- Doesn’t support more exotic filament
- AMS Lite adds significantly to the price
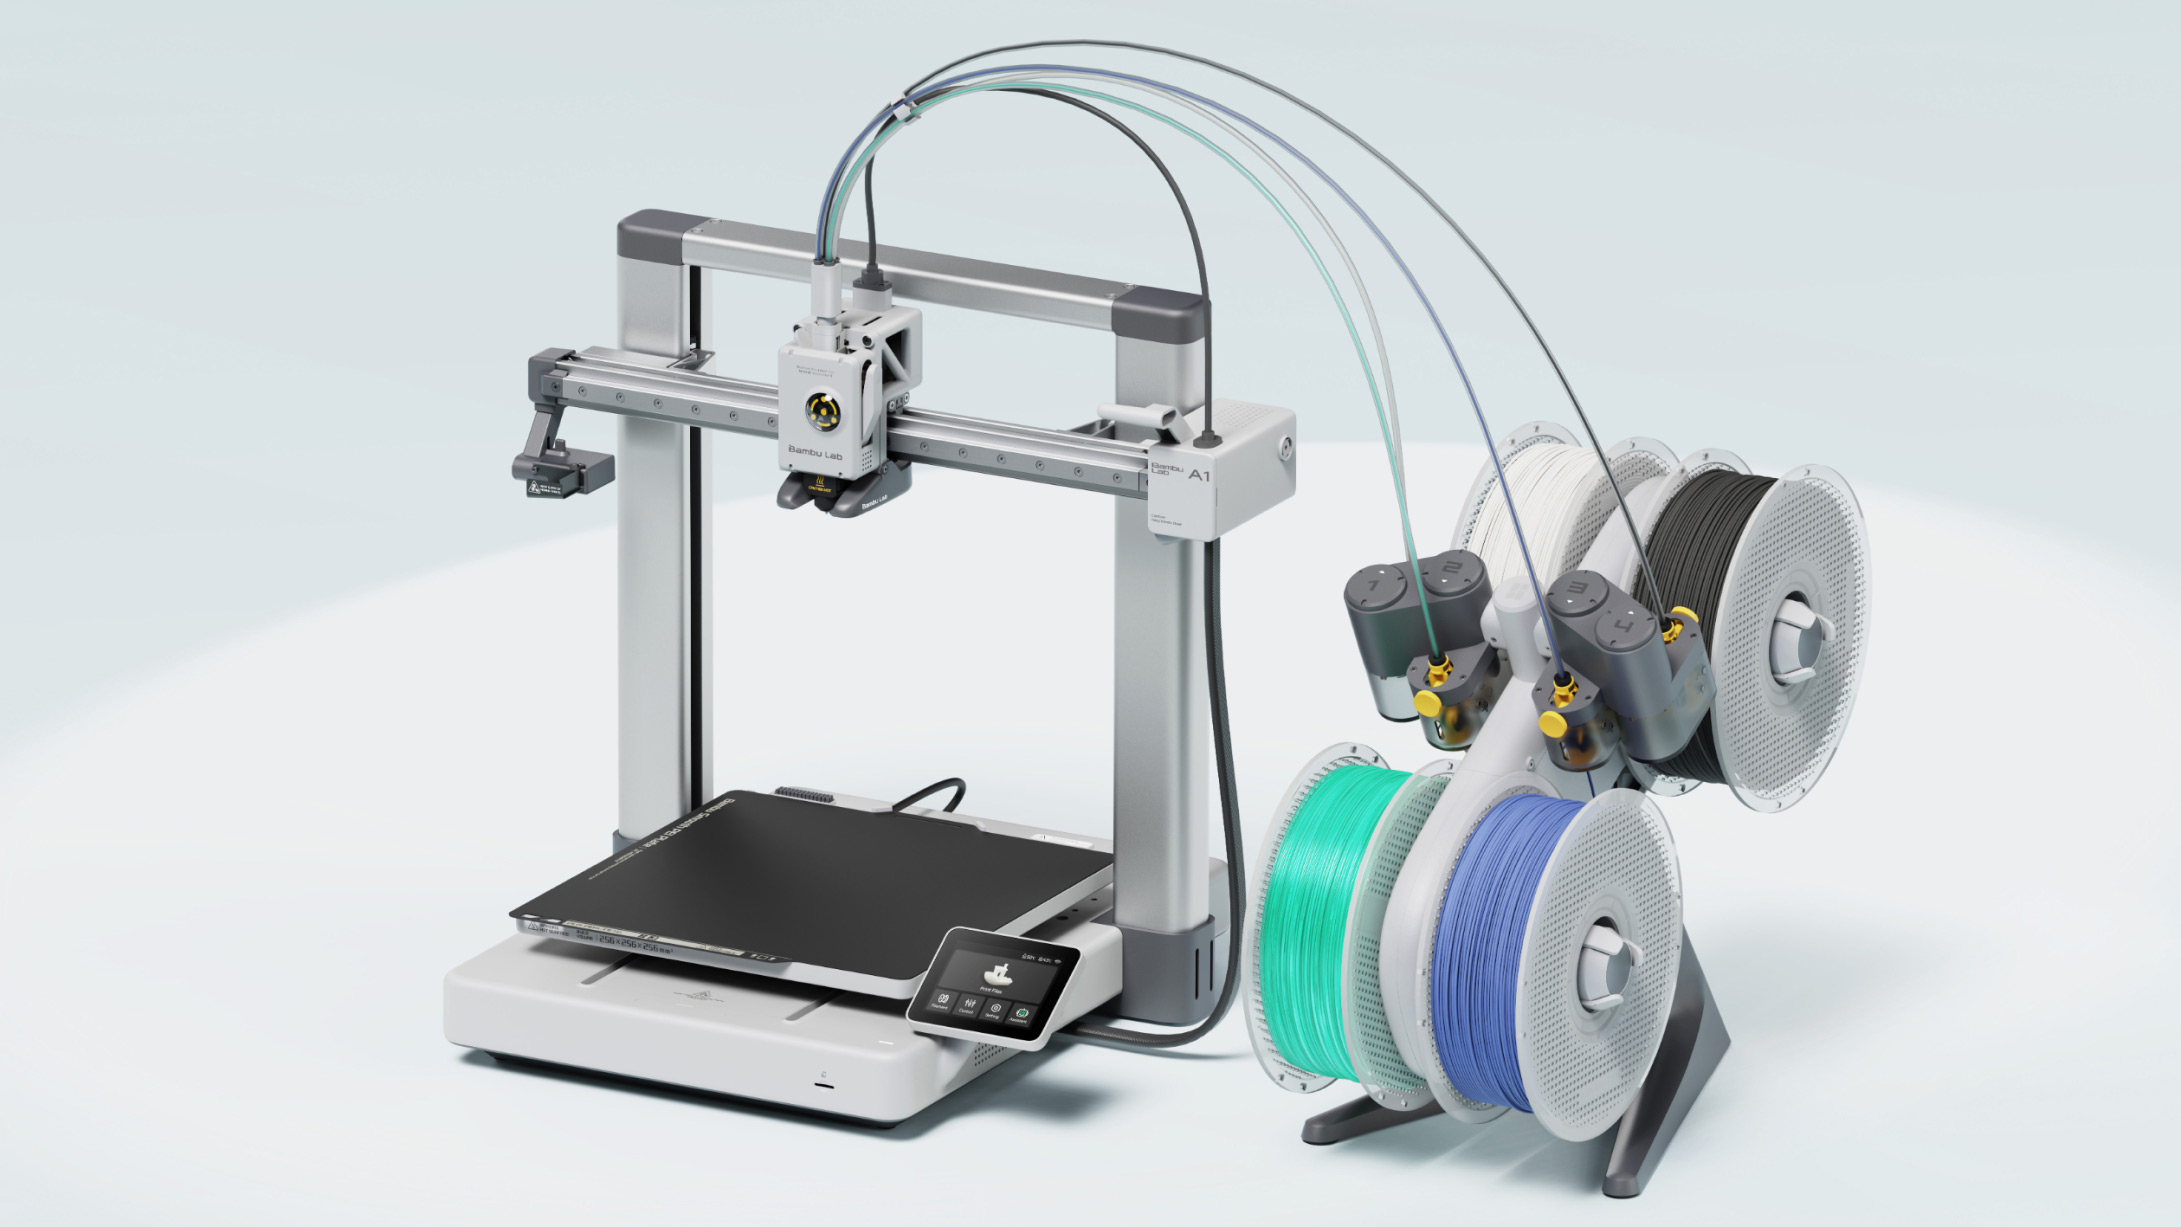
In our full review, we call the A1 “the 3D printer you’ve been waiting for”, and with good reason. It’s as close to ‘one click’ printing as you’ll get right now: it adjusts itself automatically for reliable printing and has all the features most people want, at a surprisingly affordable price. Bambu’s desktop and mobile apps are really good, too.
Like Bambu’s more expensive P1S, it can print models up to 256mm³ and you can buy the optional AMS Lite (shown to the right of the A1) for automatic multicolour printing.
The only drawback is that the A1 can’t really print nylon, ABS, ASA and other ‘exotic’ filaments because they require an enclosure. Without one, they tend to warp. The A1 can print carbon-fibre filaments if you buy Bambu’s hardened nozzle, which is very easy to fit.
Print quality, when using supported filament types, is sensational.
Read our full Bambu A1 review
3. Creality K1 Max – Best large 3D printer
Pros
- Fast, reliable printing
- Large build volume
- Fully automatic bed levelling
Cons
- Some features exclusive to Creality’s slicer
- No multi-colour capabilities
Some may say the K1 is just a poor copy of the Bambu P1S, but that does it a disservice when so many 3D printers are basically copies of each other. There are two models, the smaller K1 which is cheaper than the larger K1 Max.
The Max offers a 300x300x300 build volume, something not currently available from Bambu and it has an easy-to-use touchscreen. Bed levelling is fully automatic and it even has a LiDAR system that helps ensure prints are successful and good quality.
There’s built-in Wi-Fi and an ‘AI’ camera that can detect when prints are failing, as well as when you might have accidentally left a model or some tools on the build plate.
As both K1 and K1 Max use coreXY systems, they’re just as fast as the Bambu and although quality isn’t quite up to the P1S’s level, it’s still very good.
Read our full Creality K1 Max review
4. Elegoo Neptune 4 – Best cheap 3D printer

Pros
- Fast printing
- Automatic bed levelling
- Intuitive touchscreen controller
Cons
- No Wi-Fi
- More expensive in UK than US
- Elegoo’s slicer isn’t the best
The Neptune 4 offers everything most people are looking for in a first 3D printer. It’s easy to set up, has auto bed levelling, a colour touchscreen and is pretty fast to boot.
That’s already a lot for the low price, so it’s not too surprising it doesn’t have Wi-Fi. Unlike some of the budget models here, it competes with the coreXY printers for speed thanks to an upgraded print head with much improved cooling over the Neptune 3.
It’s a shame that like the Ender 3 S1 Pro levelling isn’t completely automatic, but once you’ve adjusted the knobs, subsequent levelling is automatic.
Print quality is very good at the default 300mm speed, but it’s a good idea to use an alternative to Elegoo’s slicer which caused us quite a few headaches when prints failed.
Read our full Elegoo Neptune 4 review
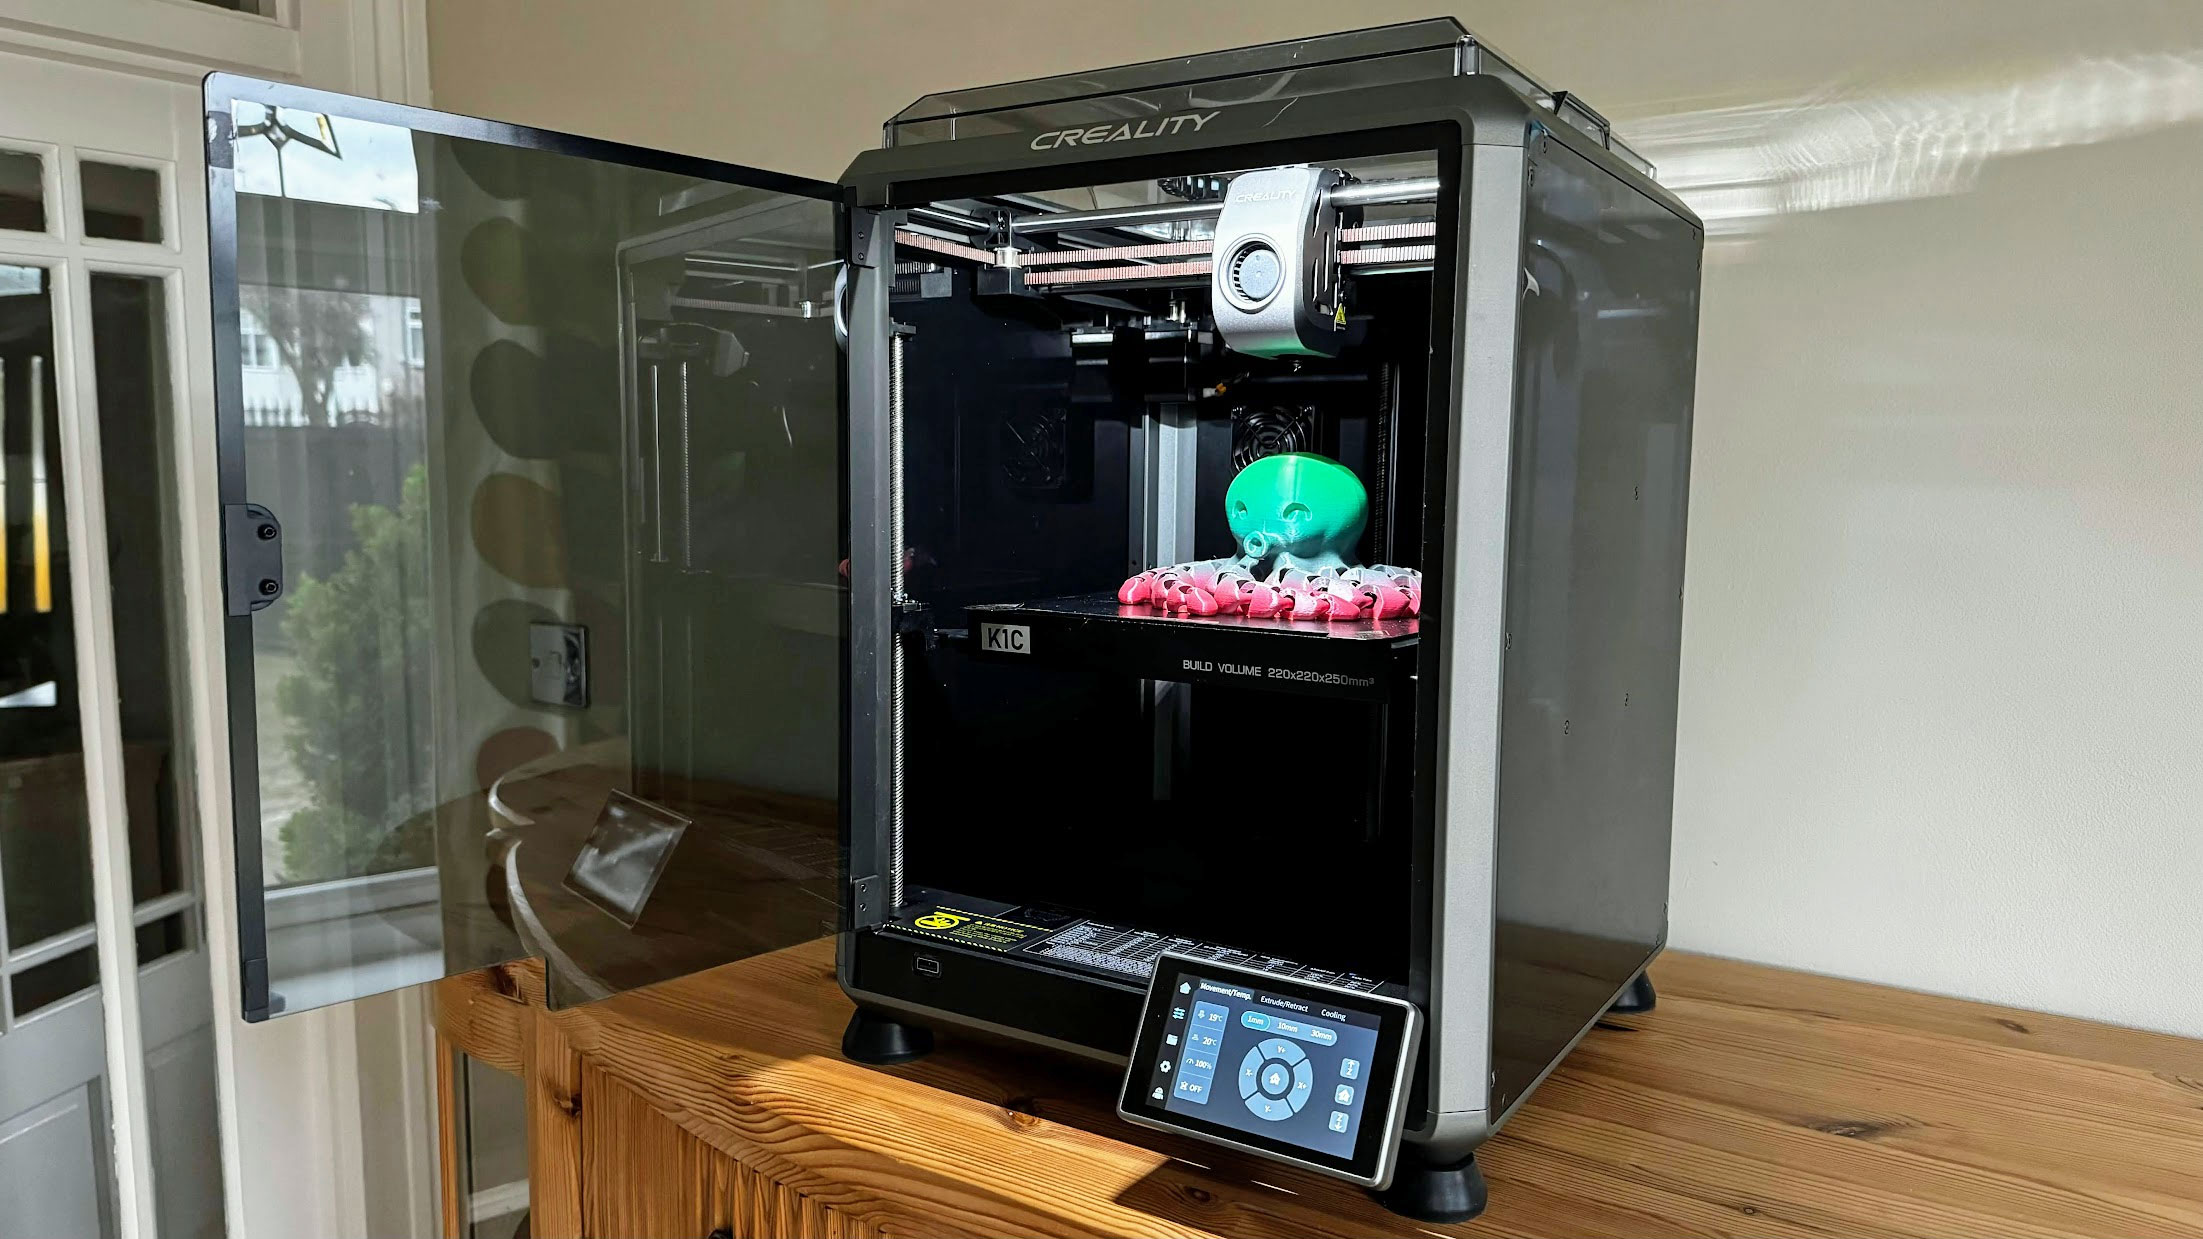
5. Creality K1C – Best for exotic filaments
Pros
- Can print carbon fibre filaments out of the box
- Can print ASA, nylon, ABS as well as PLA and PETG
- Built in camera
Cons
- Single colour printing only
- Can be very noisy
- Frustrating to change filament
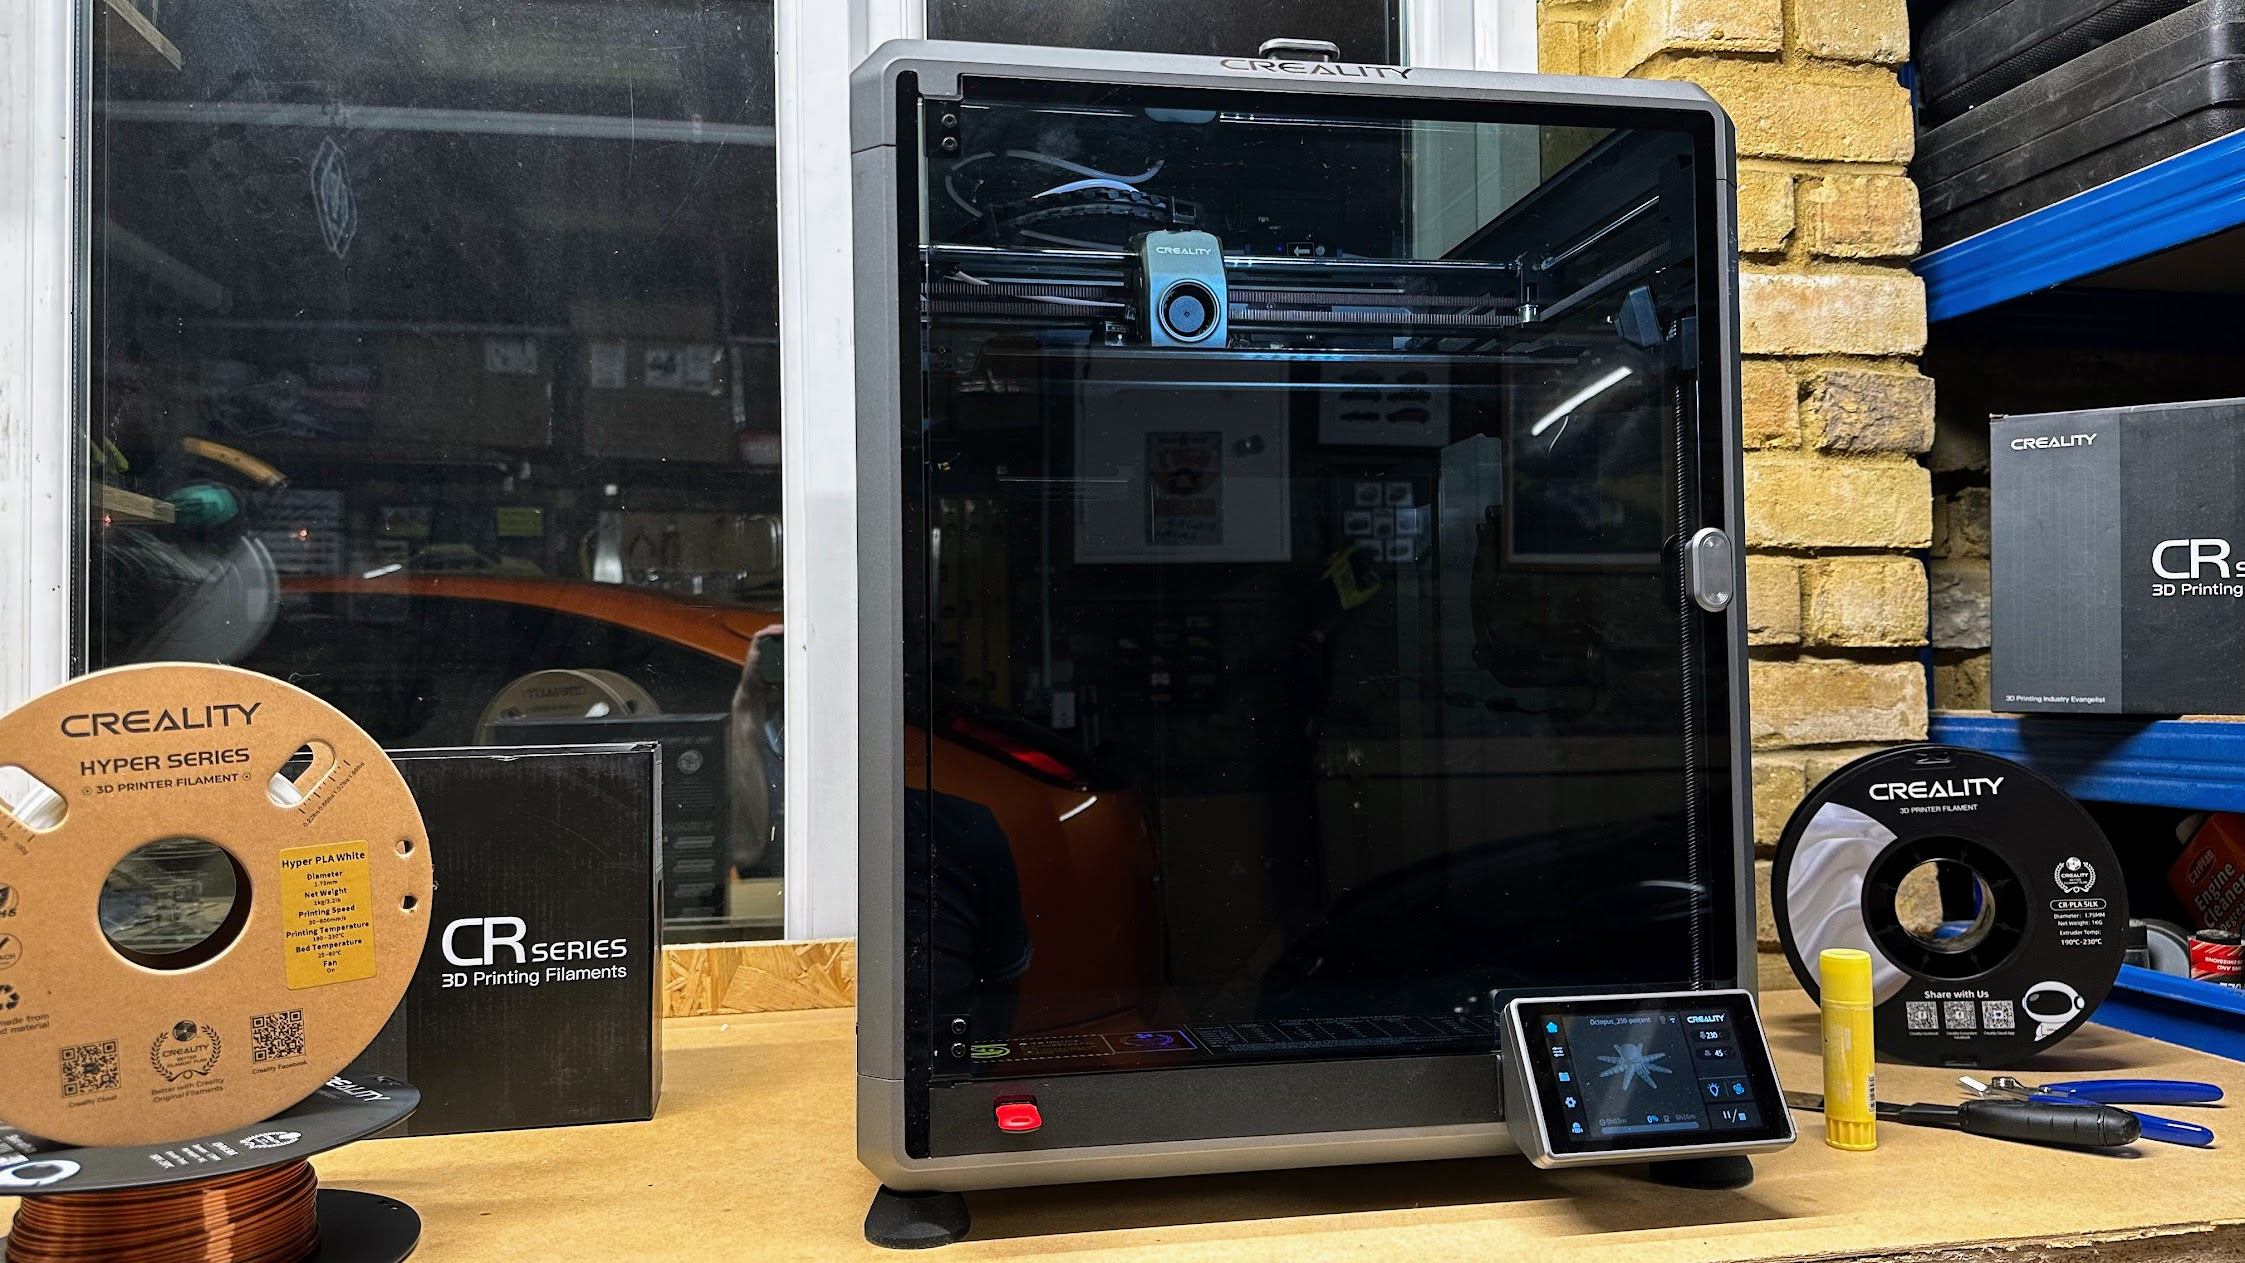
The K1C can print models up to 220x220x250mm, and comes almost fully assembled. It’s fully automatic, which means there’s no need to make any manual adjustments: it prints reliably from the word go.
Effectively, it’s an upgrade of Creality’s K1 and has a hardened steel nozzle that can print abrasive filaments like carbon-fibre infused PLA and PETG. Unlike the K1 it also has a camera for monitoring print progress remotely, and it’ll detect and notify you of problems like foreign objects left on the build plate and failed prints.
The touchscreen makes it easy to use, and Creality’s desktop and mobile apps aren’t bad, although they lack the polish and ease of use of Bambu’s.
The only real limitation is that the K1C can’t print in multiple colours, but if you don’t need to do that, it’s a great choice.
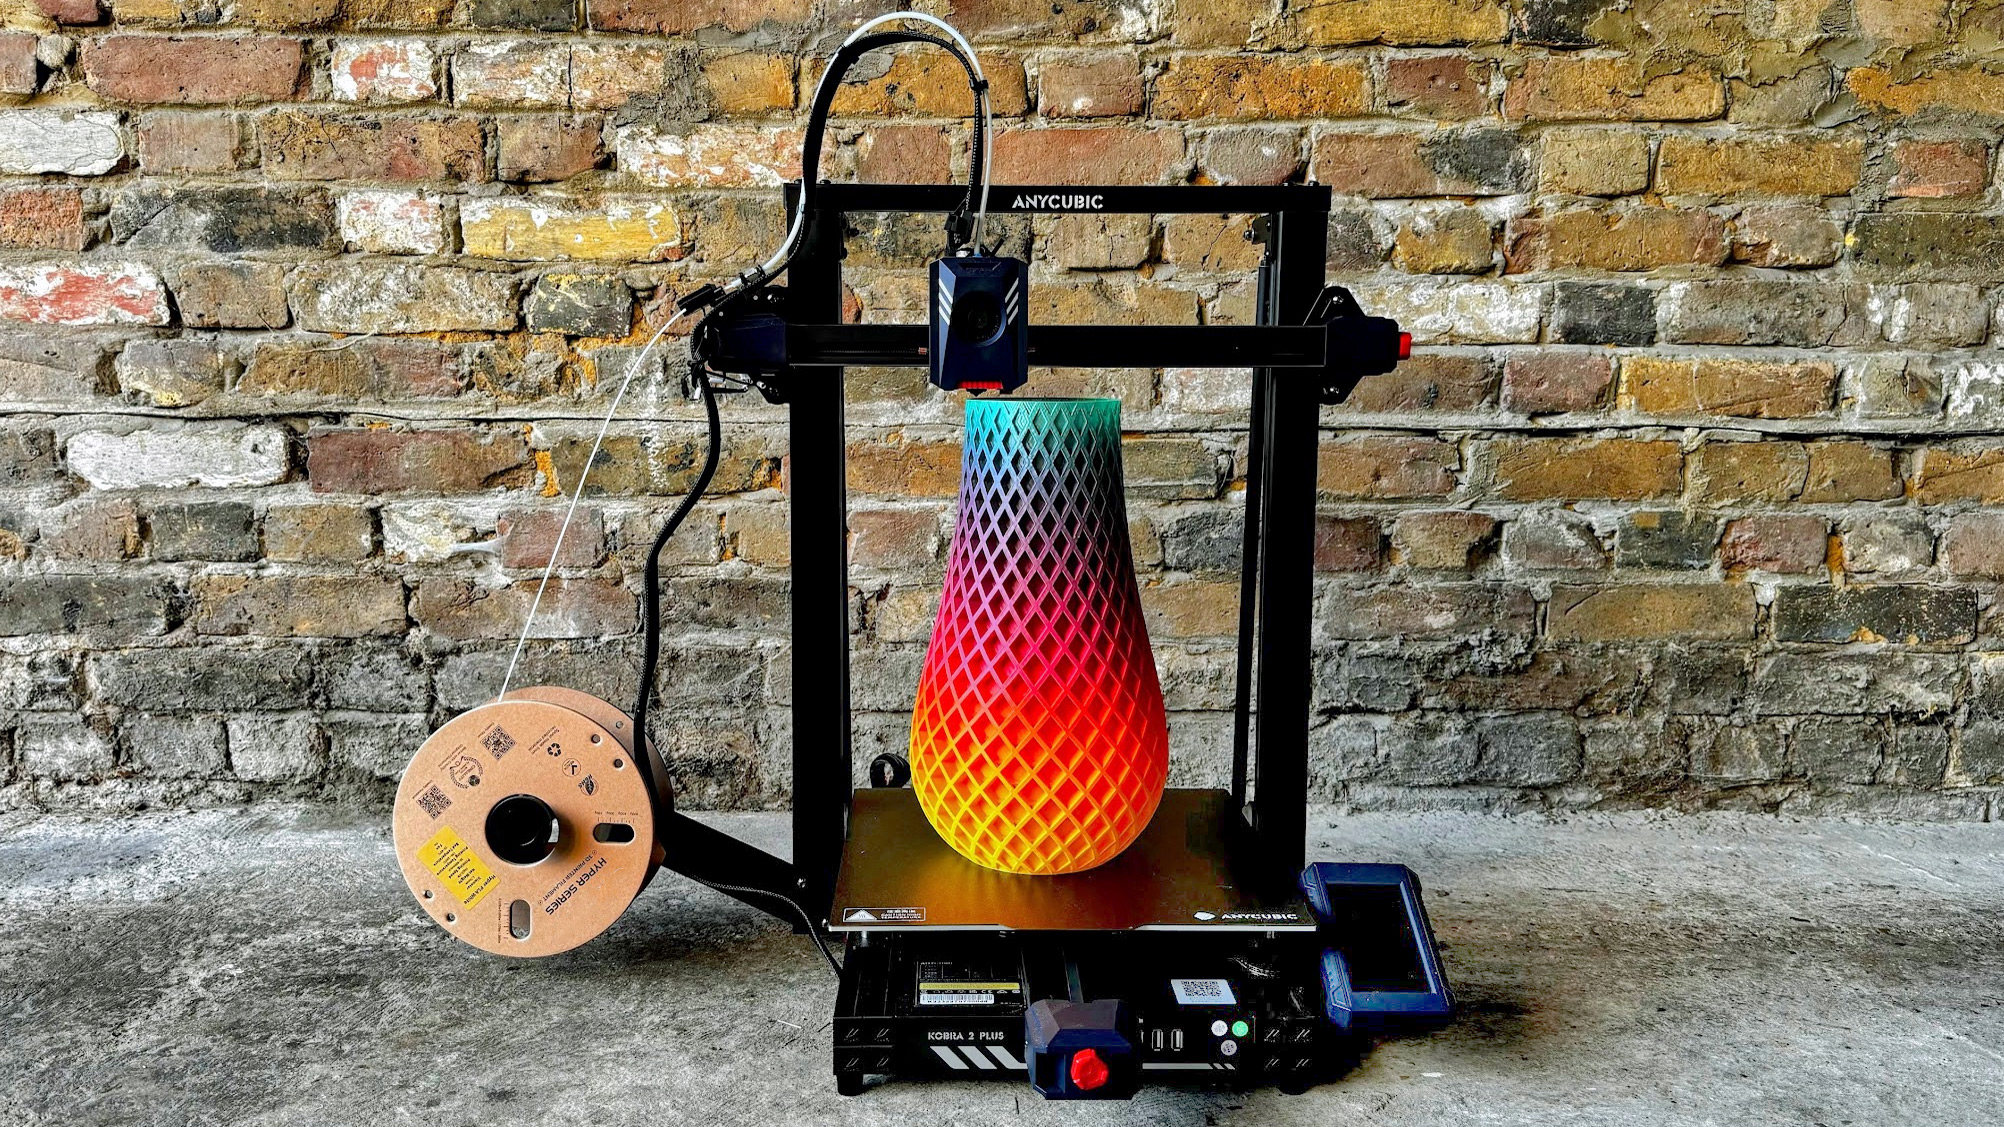
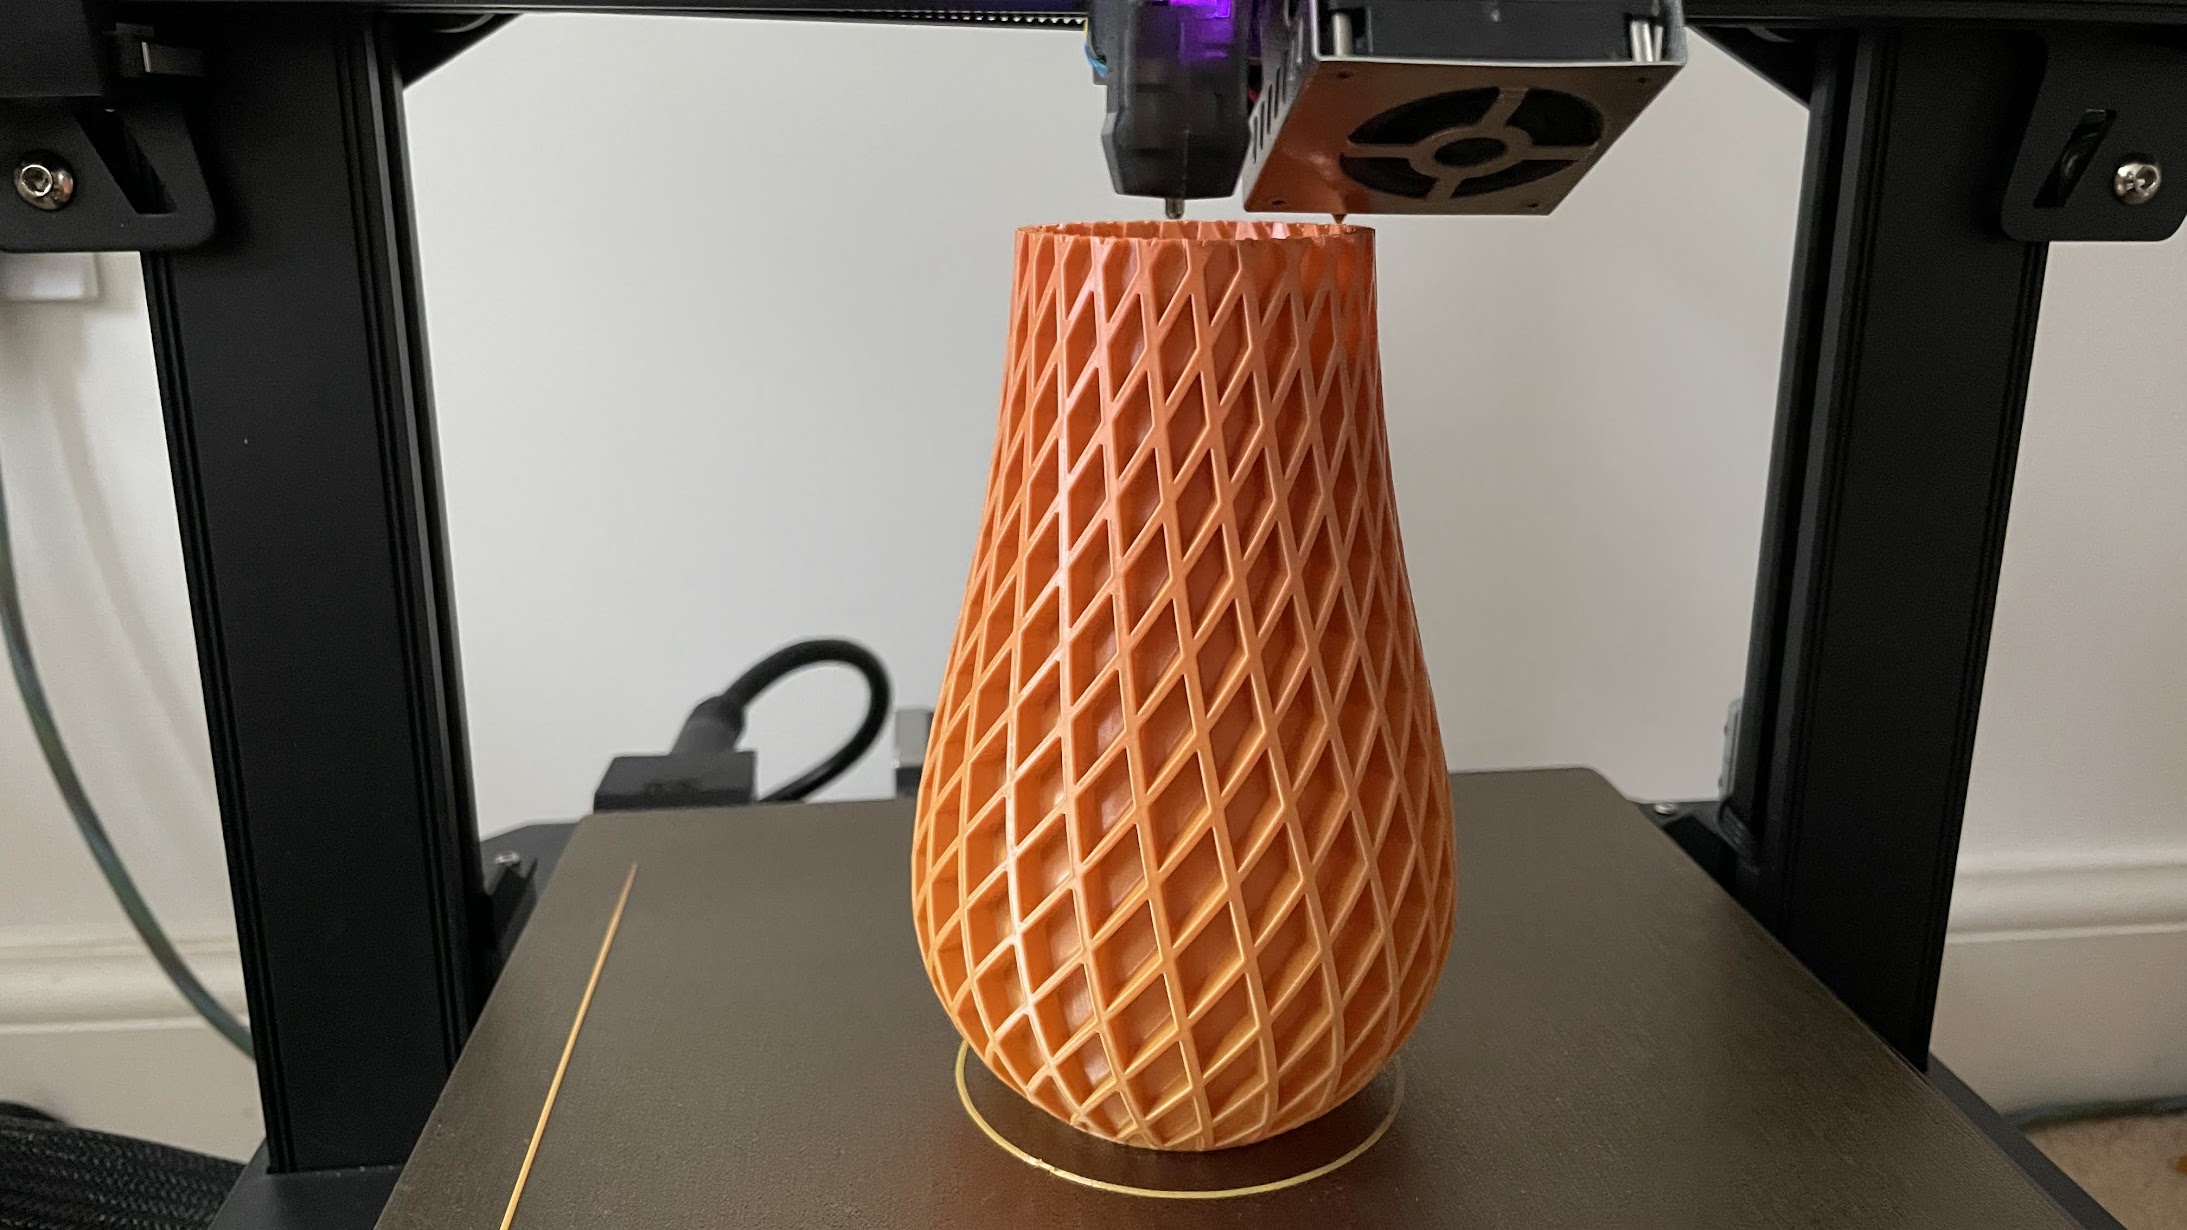
6. Anycubic Kobra 2 Plus – Best for printing huge models
Pros
- Massive build volume
- Fast
Cons
- Takes up a lot of space
- Not suitable for filaments which require an enclosure
With a build volume of 320 x 320 x 400mm (WDH), the Kobra 2 Plus can print very large models. If that’s not enough, there’s also the Kobra 2 Max with an even larger 420 x 420 x 500mm volume.
It’s a bed slinger, which means the build plate moves backwards and forwards. In turn, this means you need quite a lot of desk space for the Kobra 2 Plus. It’s fast and capable of good print quality, and is pretty easy to use thanks to automatic bed levelling, vibration compensation and a colour touchscreen.
Read our full Anycubic Kobra 2 Plus review
7. Creality 3D Ender 3 S1 Pro
Pros
- Great print quality
- Almost all the features you’d want
Cons
- Auto-levelling requires manual input
- Slow by today’s standards
The S1 Pro is really a budget 3D printer but it’s more expensive than the cheapest because it has had all the bells and whistles thrown at it.
There’s the Sprite direct drive print head with dual metal gears for reliable extrusion. It’s capable of heating to 300C, so you can print with a wide range of filaments. The bed goes up to 110C, too, which helps prints adhere when working with more awkward types of filament.
It isn’t enclosed, though, and is a bed-slinger, so needs room in front and behind it to accommodate its range of travel. There’s a useful LED strip which is really bright, and a colour touchscreen. Its interface could be improved a bit, but it’s not bad.
Print quality is very good, but it isn’t fast. To improve it you can buy Creality’s Sonic Pad – a Klipper-based touchscreen – but this adds a lot of cost and hassle. If speed is important, choose a printer that offers 300mm/sec out of the box like the Bambu A1.
Read our full Creality 3D Ender 3 S1 Pro review
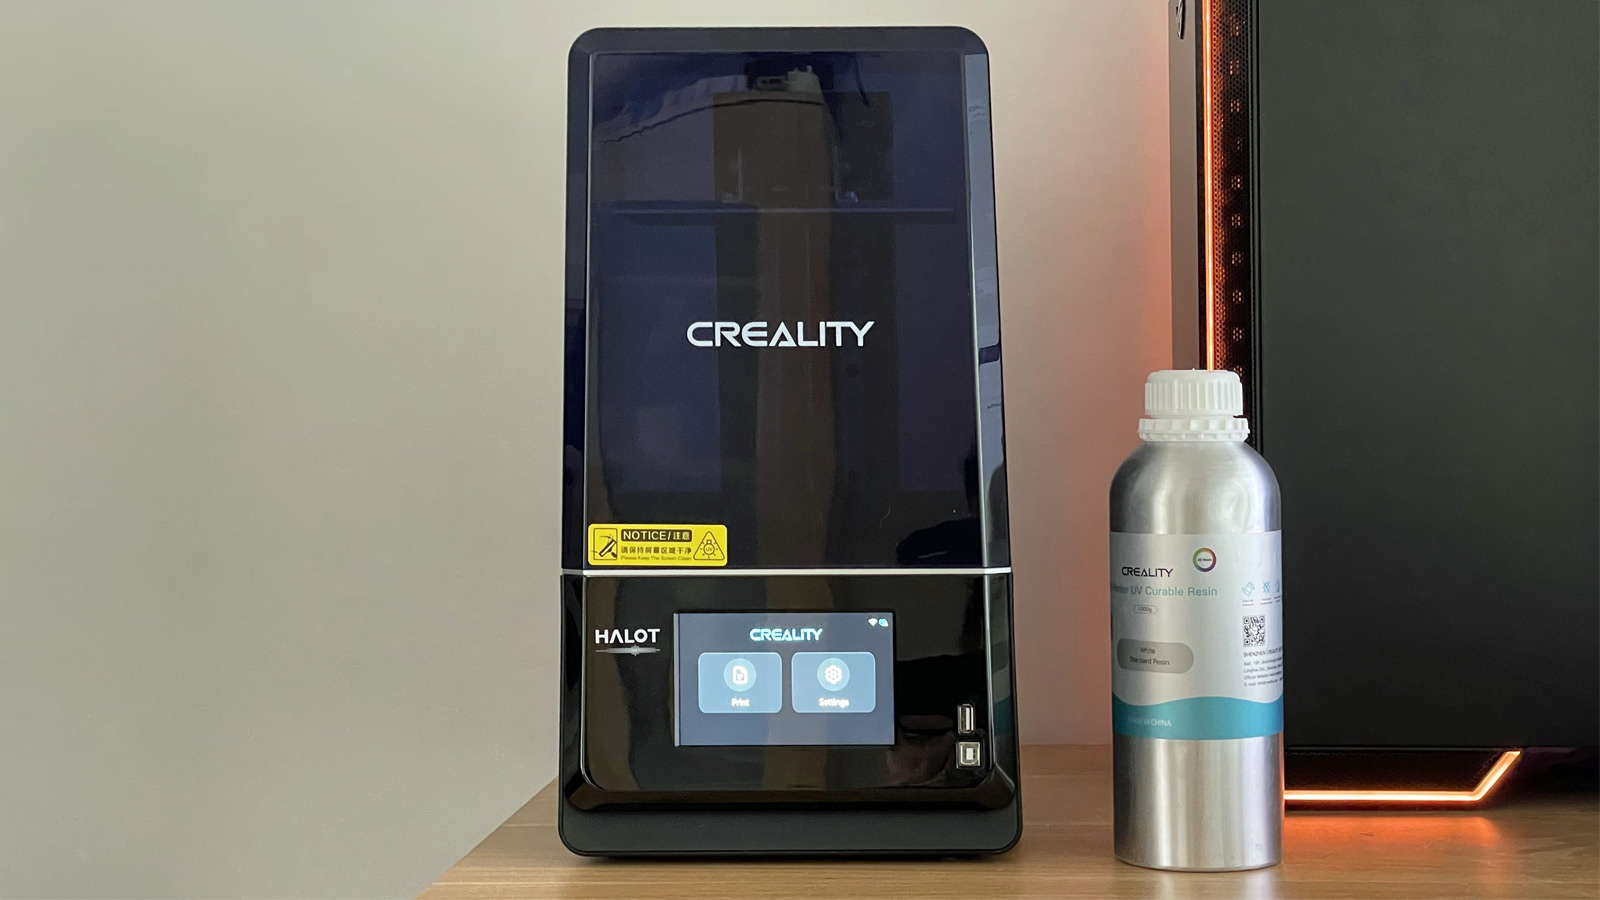
8. Creality Halot One Plus
Pros
- Easy to use & reliable
- Works with various slicers
- Great print quality
Cons
- Fan runs constantly during printing
- Requires post-printing cleanup + curing (like all resin printers)
- More expensive than some rivals
The Halot One Plus is an easy-to-use resin 3D printer that has a good-sized build volume, prints reliably and at high quality. It’s quite expensive compared to rivals, especially in the UK.
The Halot One Plus is a resin printer, so is very different to the others here. Instead of using filament on a reel, it prints using liquid resin which is cured, layer by layer, using UV light.
Build volume is smaller than the FDM printers here, but it’s still relatively large for a resin printer, and the screen’s high resolution means models have lots of fine detail.
The Halot One Plus printed ultra-reliably in our tests, but if you are keen on a resin printer, bear in mind that you have to clean up prints afterwards, which usually means buying a separate washing and curing device that looks a lot like a resin printer and takes up the same amount of desk space.
Read our full Creality Halot One Plus review
Buyer’s guide
Here are the key things you should look out for when choosing a 3D printer.
Automatic levelling
Unless the surface on which objects are printed is perfectly level, prints won’t stick to it and will fail sooner or later.
Manual levelling is a chore you could do without, so go for a printer with auto levelling. Be careful: some printers claim to have auto levelling, but rely on you to do a lot of the work. Which is why it pays to read reviews as well as knowing what to look for.
Heated bed
Almost all 3D printers have them, but it’s a must have. A heated bed will help prints to stick: don’t buy a printer without one.
PEI sheet
Models can be difficult to remove from the build plate. A PEI (polyetherimide) sheet helps immensely. It’s a flexible metal sheet with a textured coating is used, and held in place with magnets. When the model finishes printing, you simply lift the sheet off, flex it and the model pops off.
Touchscreen
Some printers still use a monochrome screen with a rotary dial or buttons. This isn’t nearly as easy to use as a touchscreen. Bambu P1S (and P1P) would be much better with a touchscreen, but it’s not the end of the world with those as you can print from your PC or phone using Bambu’s apps. When a printer doesn’t have Wi-Fi (or any networking) you are stuck using the screen it comes with.
Build volume
A printer’s build volume tells you how big an object it can print. It’s wise to assume that the actual maximum volume is a bit smaller than the specifications suggest, and go for one with a slightly larger volume than the biggest object you will need to print.
It can be hard to know this, and remember that a bigger volume means a bigger printer, which you’ll need space for.
Really large models can be printed in sections and superglued (or otherwise fixed) together, so you don’t necessarily need a huge printer.
Nozzle and bed temperatures
Most people print using PLA, the most common type of filament. It’s easy to work with, strong and durable.
All 3D printers have nozzles that go up to the 220°C or so that PLA requires. But if you want to print with ABS, PETG or another type that needs high temperatures, be sure to opt for a printer that can go up to around 300°C. But see Enclosure below, too.
Similarly, watch out for heated bed temperatures. Some won’t go beyond 80°C, but you’ll need 100°C or more for successful ABS prints.
Enclosure
Some materials such as ABS, ASA, polycarbonate and nylon need carefully controlled ambient temperature to prevent them from warping while printing. If you need to use these – perhaps because you want to print models that can survive exposure to sunlight, then look for an enclosed printer – essentially a self-contained box.
Run-out sensor
With large models taking many hours to print and the fact that you can’t always know if there’s enough filament left on the reel to complete it, a run-out sensor can be a life saver. It does it what it says: detects when the filament runs out and halts printing automatically, allowing you to load a new reel and carry on printing.
Without one, the filament could run out and the printer will carry on printing thin air, and you’d be none the wiser.
What’s the best 3D printer for beginners
The Bambu A1 is an excellent choice for beginners. It’s relatively affordable and is very easy to use because it handles so many things automatically. It’s also fast and offers top notch print quality.
How much does a beginner 3D printer cost?
Printers start from as little as $130 / £130, but you may want to spend more to get a better model with more features, faster speeds and better print quality. There are a lot of great printers under $500 / £500.
What type of 3D printer is best?
The most common type is FDM (printers that use filament on a spool), but the absolute best quality is from SLA printers, which use resin and are capable of printing much finer detail. There are lots of pros and cons of each type, but put simply, resin printers are best for small, intricate figurines, while filament printers are best for printing things that are useful around the home as well as models that hinge or articulate.
Is it cheap to use a 3D printer?
Spools of filament typically weigh 1kg and cost from $15 / £15 to $30 / £30. It’s therefore the weight of the model that matters most, not the size. So-called slicing software turns a 3D model into instructions a 3D printer can understand, and you can adjust the settings to save weight by minimising the amount of infill. Sometimes it’s cheaper to print your own parts, but sometimes you might find it’s cheaper to buy pre-made plastic things than to 3D print them.
Are 3D printers good for beginners?
3D printing is much easier than it used to be thanks to modern printers that automate a lot of the fiddly things like bed levelling. They can also compensate for vibrations, resume printing after a power cut or when the filament runs out. The difficult part is designing your own models to print, but there are thousands of pre-made models available online to download free.
Author: Jim Martin, Executive Editor, Tech Advisor
Jim has been testing and reviewing products for over 20 years. His main beats include VPN services and antivirus. He also covers smart home tech, mesh Wi-Fi and electric bikes.
Recent stories by Jim Martin:
- Creality K1C review
- Bambu A1 review
- Bambu A1: a full-size bed slinger 3D printer
