If you’ve taken a great photo or someone has sent you one by email, then there’s a good chance that you might want to print it out. While this can seem straightforward, getting results that match the size you had in mind might prove trickier than you first thought. We show you the simple way to have Windows print photos at larger sizes.
Selecting photo sizes in Windows
Windows 10, 8, and 7 all have a built-in way to print images. To do so you first need to open Windows Explorer then navigate to the folder that images are in.
If there is more than one that you wish to print, click on the first one then hold down the CTRL key and click on the others. When you’re finished, release the CTRL key and right-click on one of the selected images.
A menu will appear from which you’ll need to select the option Print .

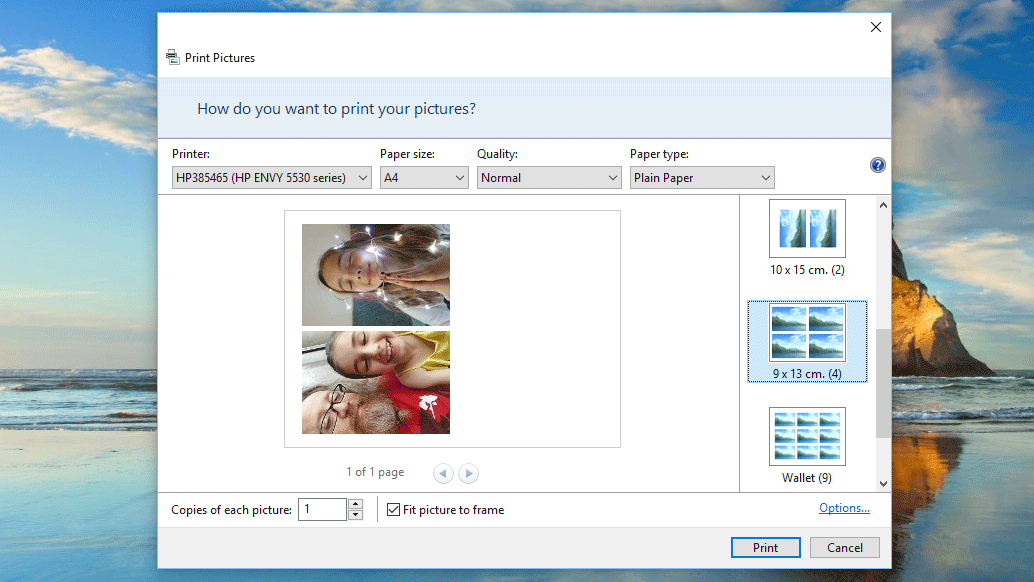
You’ll now be presented with the Print Pictures window, which has various settings along the top and side (see below). In the centre you’ll see the images as they will appear on the printout.
On the right side of the pane there are several boxes that represent how the images are sorted on the page. If you want the photo to span the entire page, select Full page photo and ensure that the Fit picture to frame tick-box underneath the main pane is also ticked. Bear in mind that ‘full page’ means the entire area of the paper size you have selected.

If you initially selected multiple photos then you’ll see that this option creates enough pages to print each one separately.
Should you wish to print more than one picture per sheet, then you can select one of the other options. Normally the first one found under Full page photo will place two images side by side, giving you half a page of A4 for your picture.

There’s also options that allows four image per page, or even more.
Depending on the size and quality of your original image, you might want to stick to half a page, as stretching smaller photos over a larger area usually ends up with a degradation of the quality.
One thing to try is looking at the top row of options and clicking on the drop-down menu entitled Quality . From here select Best and you should see an improvement in the final results.
If your printer supports larger paper formats then you can also click on the drop-down menu for Paper Size and choose A3 or whichever one suits your needs.
If you need to print photos larger than your printer is capable of printing, then you’ll need to use an online printing service such as Photobox , Vistaprint and Snappy Snaps .
For more ideas see our How to make printer colours match display and How to fix printer problems articles.
Author: Martyn Casserly, Contributor, Tech Advisor

Martyn has been involved with tech ever since the arrival of his ZX Spectrum back in the early 80s. He covers iOS, Android, Windows and macOS, writing tutorials, buying guides and reviews.
Recent stories by Martyn Casserly:
- How to scan documents with your phone’s camera
- How to flip a photo on Android
- Do you need antivirus on Windows 10 & 11?
It can be frustrating to have a great image on your Windows PC , but find that when you print out a paper copy the colours aren’t the same. There are a number of reasons this can happen – a badly calibrated monitor or printer, the type of paper you use, using old or incorrect printer drivers, or simply too many colours in the original image – but there are a few steps you can take to remedy the situation or at least improve it.
Here are the ways you can make the colours of your printed images match those you see on your PC or laptop display.
Before you plough on through the methods below, know that some printers simply cannot replicate the colours you see on your monitor. Many home printers have three or four colours to play with and these must be combined to produce the wide range of colours – the gamut – that are present in most photos. Printers aren’t all created equal and may not be able to reproduce subtle changes in colour or certain skin tones.
Also, bear in mind that laser printers are usually much worse at printing photos than inkjet printers.
Calibrate your monitor
Before fiddling with the printer settings, it’s a good idea to calibrate the colours on your monitor to ensure it’s displaying things the way it should. Part of calibration is to set your screen’s brightness and contrast so they’re at appropriate levels. If you have your monitor set to 100% brightness, images could look bright and punchy, but that isn’t what is sent to your printer: it may receive a darker version – the true version.
This is why monitor calibration is so important if you are keen to get the best colour match between screen and printer.
Windows 10 comes with a built-in calibration tool that takes you through the process step-by-step.
To begin, open the Start menu, type Colour Calibration into the search field, then select the matching result. Select the Advanced tab, then in the Display Calibration section click the Calibrate Display button.

When the calibration tool launches it will guide you through setting up the various elements of your display.

When you’re finished, choose Current Calibration to save the settings, then click Finish .
If you want to take things up to another level then you can invest in a hardware colorimeter such as the Spyder 5 Elite . This physically measures the output of your display, and adjusts everything accordingly. It’s only really for professionals or serious enthusiasts though, and will cost you £190/US$240.
Change your paper
One common complaint is that of dull or dark colours, especially when it comes to photographs. This can be enhanced by using the correct sort of paper. While normal printer paper (often called copier paper) is fine for general documents and things like that, you should really be using photo paper or specific bright white paper when printing images you’ve captured on your camera or phone.
Photo paper has a glossy sheen that makes colours appear brighter, plus the composition of the surface also affects the way the ink behaves. Don’t overlook this point: printer manufacturers work hard to ensure their paper matches their inks, so you tend to get the best results if you pair an Epson or HP printer with the same brand of paper.
You can buy photo paper in packs, but it will be more expensive than the normal sheaves of A4 you’d pick up for general use.
It’s also worth considering buying a higher quality printer paper than the normal one you might usually select. Look at the GSM rating on the pack, as this shows you how thick the individual pages are. As a general rule of thumb, the higher the GSM number the better the quality of paper, and in turn the higher the chance of you getting good results.
If your printer offers the software option to enter the specific type of paper you’re using, then be sure to do this, as it could again add some improvements to the final image.
Calibrate your printer
You don’t really want to be using generic calibration settings for a printer, as they are all slightly different. To get the best performance you’ll want to either open the printer application that came with your device, or visit the manufacturers site and download the appropriate calibration software.
Each will take you through the steps required to get your device up to spec, usually involving printing out sheets and then scanning them back into the printer itself.
Hopefully, with all these steps complete, you should find that your prints are much closer to those on your screen.
Again, if you want to go down the professional route then there are calibration tools available online, as well as ICC profiles on offer from a variety of photo specialists, but for most people, most of the time, the steps above should get close enough while keeping costs to a minimum.
For more ways to deal with paper related problems, check out How to fix printer problems and we also have a useful guide on how to print out photos using Windows’ built-in functions..
Author: Martyn Casserly, Contributor, Tech Advisor
Martyn has been involved with tech ever since the arrival of his ZX Spectrum back in the early 80s. He covers iOS, Android, Windows and macOS, writing tutorials, buying guides and reviews.
Recent stories by Martyn Casserly:
- Do you need antivirus on Windows 10 & 11?
- Do cheap Windows keys work?
- How to dual boot Windows
Printers are great when they work, but when they don’t it can be extremely frustrating. Here’s how to solve some of the most common problems, including not printing at all through to blocked nozzles and other issues.
Printers can run reliably for many years and thousands of prints, but they can also malfunction or stop working entirely.
Sometimes the reason is as simple as over- or under use. Many people don’t use their inkjet printers often enough and this can lead to problems with dried-up ink blocking the nozzles. Overuse is less common than misuse: paper clips, hair bands and even food can fall into printers and cause paper jams (and worse).
If your printer can’t be fixed with these tips, check out our list of the best printers to buy, and the best printer deals right now.
My printer won’t print
There are many reasons why your printer won’t print, so start with the basics such as checking to see whether there is an error message or warning light on the printer. Make sure there is paper in the tray(s), check the ink or toner cartridges aren’t empty, the USB cable is plugged in or the printer is connected to Wi-Fi.
And if it is a network or wireless printer, try using a USB cable instead. In our experience, some Wi-Fi printers are unreliable in terms of their connection. So it’s worth unplugging your printer and any powerline network adapters it’s connected to, then turning everything back on again.
Select the right printer!
Sometimes the reason a printer won’t print is because you’ve installed some software which has a ‘virtual’ printer and this has set itself as the default. When you hit Print, a file will be saved by this virtual printer instead of the document being sent to your physical printer.
To check this, open the Control Panel from the Start menu. Then go to Devices and Printers, right-click the correct printer to use and set it as the default. (While you’re there, you can also ensure the printer’s status is set to Ready. If not, this could be the source of the problem.)
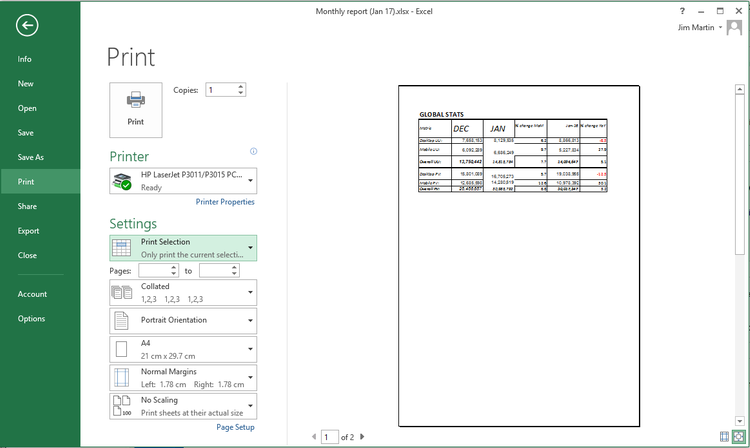
Next, make sure that the correct printer is selected in the program you are printing from – you should see an option to choose from a list as in the image below.

Microsoft has a printing troubleshooter that can help to identify problems. Click the Fix it button, download and run the program, then follow the steps in the wizard.
You can also open the Control Panel, Devices and Printers, right click the printer icon and select Troubleshoot. It doesn’t always help, but it’s worth trying.

HP has a Print and Scan Doctor to identify problems, and Canon has lots of great videos on its website – click your printer model and then click the Troubleshooting videos link.
Why can’t I print from my phone or tablet?
To print from an iPad, iPhone or iPod Touch, the printer must have Wi-Fi and also support AirPrint. The list of AirPrint printers is growing, but there are still a lot of printers, particularly older models, that don’t support it.
If you have a Mac with a printer attached, you can turn it into an AirPrint printer using HandyPrint . Printer Pro is an app for iOS devices that enables them to print to many wireless printers or a wired one attached to a PC or Mac.
Some Samsung phones, tablets and printers are designed to work together and printing is straightforward. Samsung also has its own app for printing to its printers, including from iPhones.
To print from any Android phone or tablet to any PC-connected printer you can use Google Cloud Print.
Install Cloud Print on the mobile device from the Google Play store . Next, using Google Chrome on your PC, go to the menu, Settings, Advanced Settings and click Manage. You can then add the printer attached to the PC. Provided the PC and printer are switched on, you can print from the Android device.
Do I need to replace the cartridges?
Printers warn that the ink is running out before it actually does. If you print only occasionally the remaining ink or tonermight last another couple of weeks, if not months.
Order new cartridges as soon as the message appears, but don’t install them until it either stops printing or the colours fade. A trick with laser printers is to remove the cartridge that’s running low and shake it gently from side to side. This sometimes allows the rest of the toner to be used. In other cases a counter is used and once a certain number of pages has been printed, the cartridge will be deemed as empty.
HP has an interesting scheme with many of its printers where you pay per month and cartridges automatically arrive at the right time.
If your colour ink has run out, but you must keep printing, you might be able to set your printer to print in black and white only. This is a setting you’ll find in printer properties in the Control Panel – or click the option when you go to print via an application you want to print from.
Why won’t web pages, Excel documents and photos print properly?
Web pages
Web pages can be any size and they aren’t limited by the width or height of the paper in your printer. They aren’t usually designed to be printed, which is why problems can occur.
Much of the time you will find a shrink-to-fit option in the printer settings that helps when your document or photo is just a bit too big to fit on the page. Some web pages, such as those with printable coupons, have a print button within the web page. Use that and not the print menu in the browser.
Office documents
If you’re trying to print an Excel sheet, be sure to select only the cells you need to print before clicking Print. Then you can choose ‘Print selection’ and change the other options to make sure it fits well on an A4 sheet. You can do other things, such as reducing the size of the margins, and switching from landscape to portrait orientation.
Similarly, when printing a Word document or any other, you can usually specify which pages to print so you don’t have to print them all.
Photos and pictures
For photos or images you want to print, it’s usually best to right-click on them in Windows Explorer and click Print. This way you will get to choose how large to print each photo.
If you select multiple photos in a folder, then right-click and choose Print you will be able to print them all at once, with more than one per sheet of paper (and you can choose the paper size here too). It’s similar to the ‘n-up’ option that you’ll find in Printing properties which allows you to print multiple pages of a document on a single sheet of A4.

Why does my printer say “Error”?
There are a few possible reasons, but the most common is to do with paper. T he first thing to check is whether the input tray is empty, but it’s also worth checking for paper jams. If you find one, try to work out why it’s happening rather than just pulling out a crumpled piece of paper from the paper tray and assuming you’ve fixed it.
Take the paper out of the tray, open all the flaps and look inside. You might need a torch to see the paper and long tweezers to reach it, especially if it’s only a very small piece which has been ripped off and left inside.
Look underneath the printer because there may be an access panel that can be removed to examine and clean the paper feed mechanism.
Old paper can absorb moisture, which makes it stick and then it is pulled through two or more sheets at a time. Keep it in a bag until it is needed. Check out Canon’s troubleshooting videos to see how to remove pieces of paper stuck in printers.
Also, try using thinner paper: most home printers will only handle photo paper at a maximum. They can’t usually print on card as it’s too stiff to be fed around corners.
Why is the print quality poor?
The nozzles on inkjet printer heads can become blocked causing horizontal streaks on prints and poor or wrong colours. Cleaning the print heads can solve the problem. The procedure varies from printer to printer and there may be an option on the printer control panel or in the printer software on the computer.
You might need to look this up in the manual. In your printer’s properties (either in an app or in the Windows Control Panel) you might find a maintenance section.

The type of paper affects the print quality and photocopier paper might be letting you down.
It can be too absorbent and inkjet ink soaks into it like blotting paper. Buy good quality paper for the best prints, and this is usually from the printer manufacturer itself, particularly for printing photos.
Laser printers are less dependent on paper, and smudges or spots in the same place on each page usually mean there’s dirt somewhere in the printer, typically on the ‘drum’.
Be very careful when cleaning the imaging drum, using only isopropyl alcohol and a soft lint-free cloth.
Read the manufacturer’s guidance on how to remove and clean the drum, which is often called an OPC.
We’ve also written a guide on how to match the colours on your screen to your printer.
