Capturing gameplay shots on your Nintendo Switch console is all well and good, but if you want to store these on your phone (or post them online for all your friends to see), then there is a way to transfer images from your console, directly to your smart device or PC.
Prior to the version 11.0.0 update, the only way to get hold of images was to post them to a social platform from the app in your Switch and download them from there. Now though, there is an easier way.
Here is your guide to sharing screenshots on your Nintendo Switch. You can also check out our tutorials on how to take a screenshot on a Switch and how to use Bluetooth headphones with a Nintendo Switch .
How to share Nintendo Switch screenshots to a smartphone
Whilst Nintendo does have an official way to share screenshots over Wi-Fi, it is not without its limitations. For one, you can only share up to ten screenshots at one time. In addition, it involves numerous QR codes, making the process quite tedious.
Here are the steps you need to take to transfer a screenshot from your Switch to your phone:
- Head into your album and select the photo or video you want to share

- Press ‘A’ and click on ‘Posting and Editing’

- Click ‘Send to Smart Device ’

- Choose ‘Send Individually’ to send a singular image, or choose ‘Send Multiple’ to send up to ten different images

- The Switch will now display a QR code. Scan this with your smartphone, and the devices will synchronise via Wi-Fi

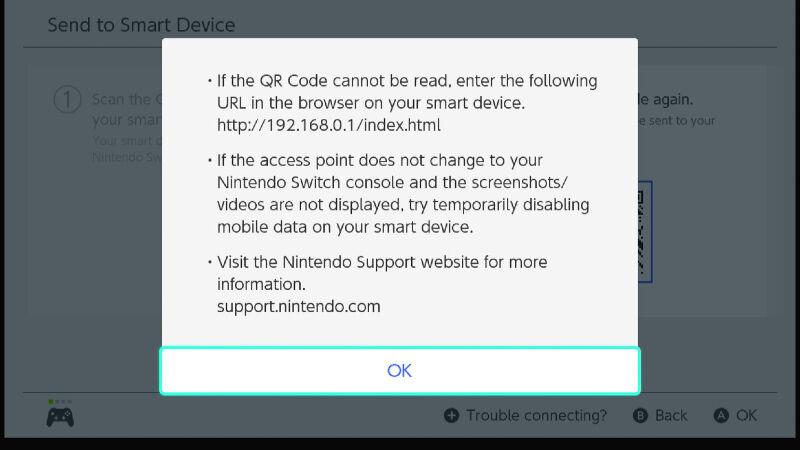
- If you can’t scan the QR code, click the plus button that says ‘Trouble connecting?’. This will prompt you to connect to the Switch network by entering the password provided

- Scan the second QR code that appears, which will take you to a download page on your phone

- Again, press the plus button if the QR code does not work, and enter the URL provided into your device browser
- The files will then either automatically download to your phone, or you can click on them individually to download them – this will depend on your device

- Press ‘End’ once all the files have been transferred

How to share Nintendo Switch screenshots to a PC or laptop
Providing you have USB-C cable handy (the one Nintendo provides with your console will work), transferring screenshots from your Switch to your PC or laptop is much easier than using your phone.
- Connect your PC to your Switch via a USB-C cable. This is located at the bottom of the console (in handheld mode for the main Switch)

- Open the Switch’s system settings, then click on ‘Data Management’, and then ‘Manage Screenshots and Videos’

- Select ‘Copy to PC via USB Connection’. There may be a short wait whilst your PC recognises the console

- Click on ‘Nintendo Switch’ icon under ‘My Computer’ once your Switch has confirmed that is connected to your PC

- Click on ‘Album’

- The folders will display those games which have screenshots/videos

- Click on the folder you want and copy and paste the images onto your local PC storage. Repeat as many times as necessary

- Disconnect the cable once you are finished, and the Switch will confirm that you are no longer connected to your PC. You can also use a similar method for transferring images on a microSD card

How to share Nintendo Switch screenshots on social media
If you want to share screenshots on your social platforms, then you can do this without having to download them to your phone or PC.
Nintendo allows you to link up some of your social profiles to your account. However, it only supports Facebook and Twitter.
- Head into your album and select the photo or video you want to share
- Press ‘A’ and click on the ‘Posting and Editing option’
- Click ‘Post’

- Choose whether to post an image individually, or whether to post multiple – you can select up to four images for one post

- Pick which profile is posting – there may be different social accounts linked on each profile

- Choose the social account you want to post from – your social accounts must be linked to your Nintendo account for this to work

- Edit the post text – some (such as Twitter) will automatically generate hashtags, but you can edit these

Click ‘Post to Twitter/Facebook’
Best Nintendo Switch games
Best Nintendo Switch deals
Nintendo Switch (OLED) review
Author: Hannah Cowton-Barnes, Entertainment Editor, Tech Advisor

As Tech Advisor’s Entertainment Editor, Hannah is the resident expert in all things streaming, film and TV. Before joining Tech Advisor in 2019, she studied Theatre and Performance at the University of Leeds and created a website dedicated to geek culture and lifestyle. She’s also reviewed a whole range of gadgets including flagship smartphones, wearables and styling tools. Outside of Foundry, she’s written freelance pieces for Polygon, Metro and Den of Geek, and is proud to be a Women Techmakers Ambassador for Google.
Recent stories by Hannah Cowton-Barnes:
- These are the best games to play on the Nintendo Switch 2 right now
- Netflix’s Assassin’s Creed TV series has found its first star… but who is he playing?
- Everything I bought at Nintendo’s London pop-up store (as a mum-to-be)
